> ## Documentation Index
> Fetch the complete documentation index at: https://www.spread.so/docs/llms.txt
> Use this file to discover all available pages before exploring further.
# Create a List and Set Recipients
> Learn how to create a recipient list and set it as your email recipients.
## Overview
In Spread, you set email recipients **by 'list', not by individual email address.** So to send an email, you first **create a recipient list**, then select that list as the recipient when composing a campaign.
The overall flow is as follows.
1. **Add contacts** — Add subscribers (contacts) to Spread via [Google Contacts sync](/docs/google-contacts-sync) or [Import](/docs/import/ai-import).
2. **Create a list** — Create a list to hold the contacts you added.
3. **Set recipients** — Select that list as the recipient when composing a campaign.
4. **Send** — [Compose and send your email](/docs/send-email).
Contacts must be added to Spread before they can be placed in a list. To add contacts, see [Google Contacts sync](/docs/google-contacts-sync) or [Import](/docs/import/ai-import).
## Step 1. Create a recipient list
A list is a **list of subscribers** you want to send an email campaign to.
Click **Lists** in the left menu of the Spread app to go to the Lists page, then create a new list. Splitting lists by purpose (e.g. newsletter subscribers, product users, event attendees) lets you send more precisely by segment.
There are two ways to add contacts to a list.
* **Add existing contacts to a list** — Select the subscribers you want from your full contact list and add them to the list.
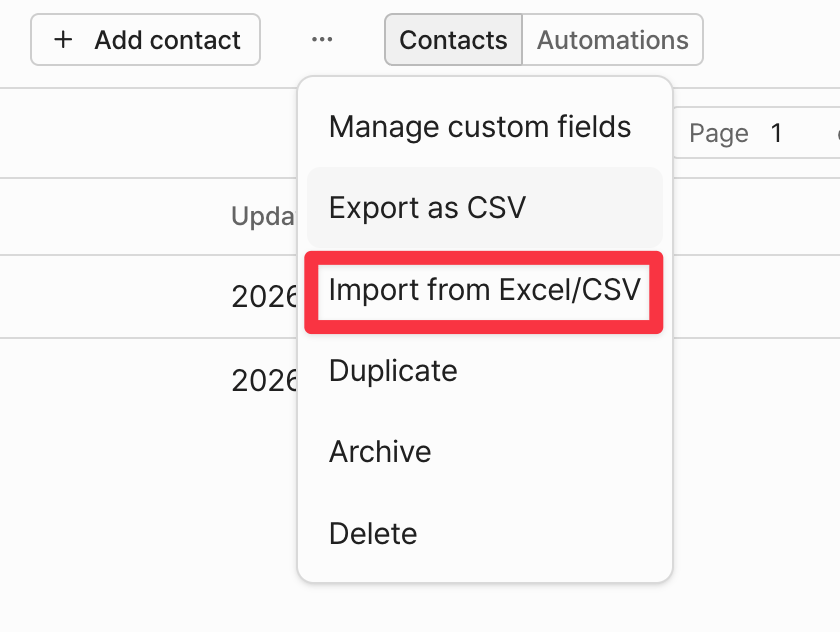
* **Import directly into a list** — Create a list first, then import a CSV/Excel file directly into that list. Select **`Import from Excel/CSV`** from the `···` menu at the top of the list.
 **Where do contacts go when you import directly into a list?**
Contacts imported directly into a list are **added to that list and, at the same time, to your workspace's full contact list.** In other words, you fill the list and your overall contact database at once.
For detailed steps, see [Import — Import directly into Lists](/docs/import/ai-import#import-directly-into-lists).
To keep your lists safe and protect your deliverability and domain reputation, see [Manage lists](/docs/manage-lists).
## Step 2. Set the list as recipients
On the campaign composition screen, select the list you created under **`Recipients` → `List`**. All leads in that list become the send targets. If you have no lists, you cannot send a campaign, so be sure to create a list first.
**How you set recipients differs slightly by sending method.**
* **One-off Campaign**: Select the **list** under `Recipients`.
* **Triggered Campaign**: Connect a `Source list`. Sending starts the moment a lead is added to that list.
* **Sequence**: Add **individual contacts** in the `Recipients` tab.
For detailed setup of each method, see [Send an Email](/docs/send-email).
**Where do contacts go when you import directly into a list?**
Contacts imported directly into a list are **added to that list and, at the same time, to your workspace's full contact list.** In other words, you fill the list and your overall contact database at once.
For detailed steps, see [Import — Import directly into Lists](/docs/import/ai-import#import-directly-into-lists).
To keep your lists safe and protect your deliverability and domain reputation, see [Manage lists](/docs/manage-lists).
## Step 2. Set the list as recipients
On the campaign composition screen, select the list you created under **`Recipients` → `List`**. All leads in that list become the send targets. If you have no lists, you cannot send a campaign, so be sure to create a list first.
**How you set recipients differs slightly by sending method.**
* **One-off Campaign**: Select the **list** under `Recipients`.
* **Triggered Campaign**: Connect a `Source list`. Sending starts the moment a lead is added to that list.
* **Sequence**: Add **individual contacts** in the `Recipients` tab.
For detailed setup of each method, see [Send an Email](/docs/send-email).