> ## Documentation Index
> Fetch the complete documentation index at: https://www.spread.so/docs/llms.txt
> Use this file to discover all available pages before exploring further.
# Forms
> You can collect leads through forms and automatically connect them to follow-up actions.
## Overview
Using Spread’s Forms feature, you can easily capture and qualify leads and effectively connect them to your sales and marketing workflows. Whether you are building an [Inbound Sales Engine](https://www.relate.kr/blog/inbound-sales-engine/) or planning marketing activities, Forms help you operate with a more efficient and effective process.
By collecting the right information through forms, you can ultimately identify potential customers who are highly likely to make a purchase ([Sales Qualified Leads, SQL](https://www.relate.kr/docs/wiki/sql#sales-qualified-lead-sql)), and smoothly move them to the next stage of the [pipeline](https://www.relate.kr/docs/features/pipelines) to continue sales activities all the way to final purchase.
## Creating and managing forms
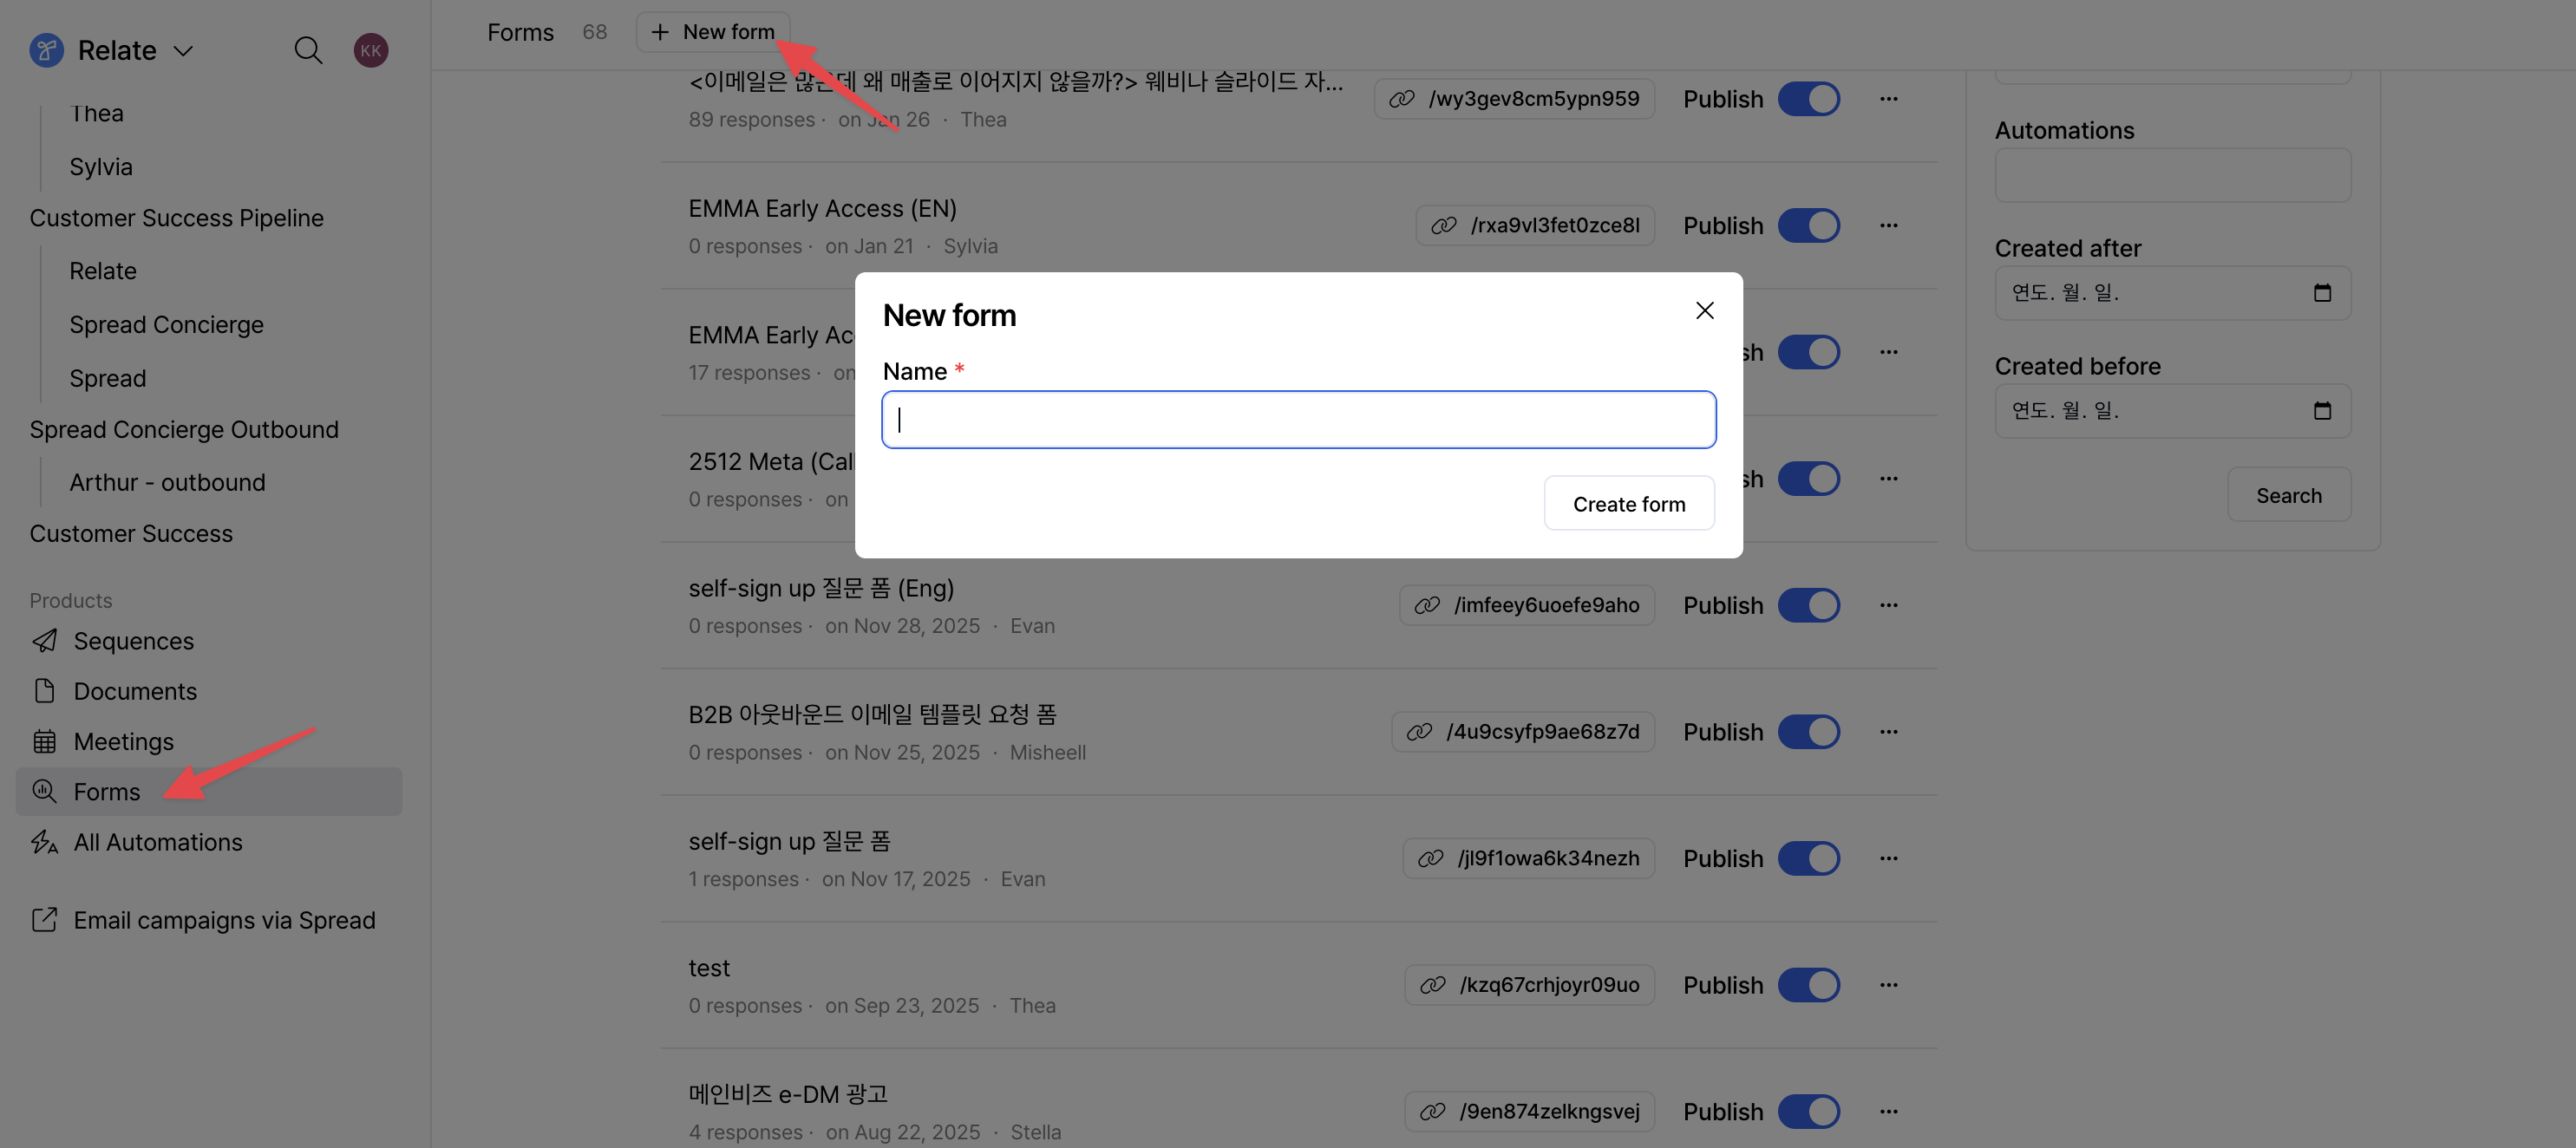
From the left sidebar of the Spread app, select `Forms`, then click the `+ New form` button at the top to create a form.
Once a form is created, you can configure everything (from form structure to response management, routing, and automation) on a single screen through the four tabs at the top.
### 1. Editing a form
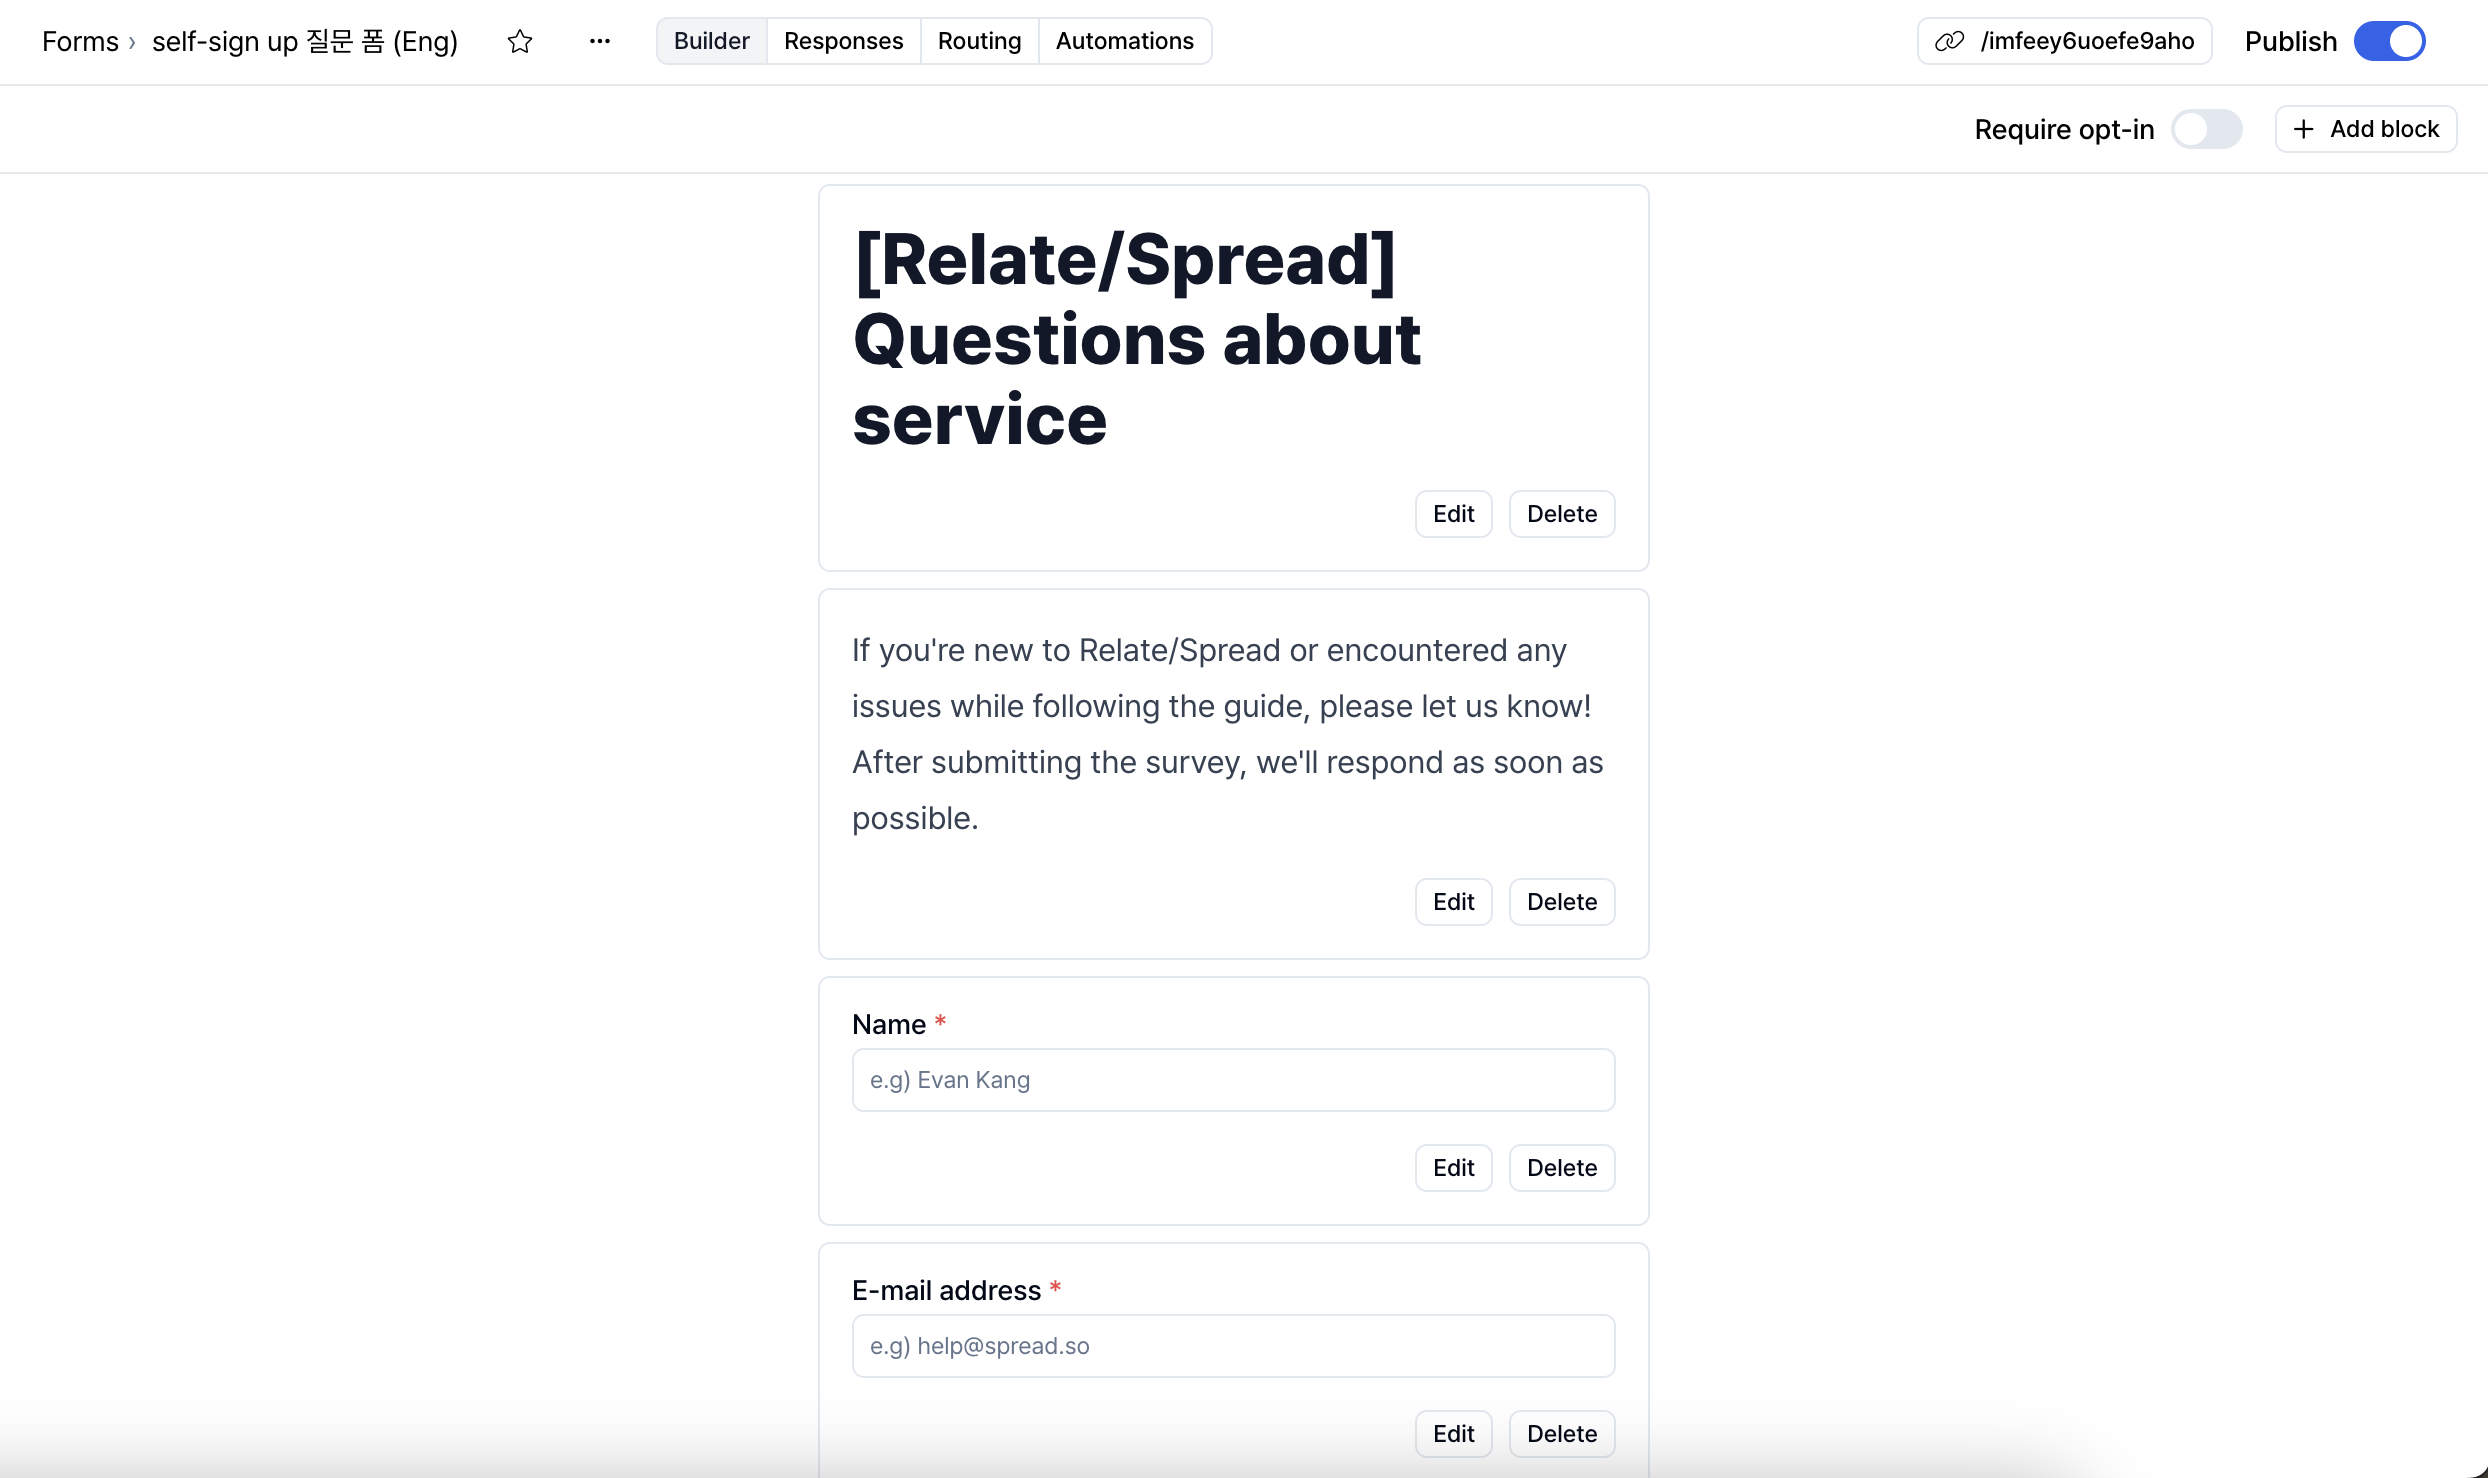
After a form is created, click the form and customize it as needed in the `Builder` tab at the top.
First, click the `+ Add block` button in the top-right corner to create blocks based on your purpose.
* Block types available in forms
* Title, subtitle, text
* Basic data fields for contacts and organizations
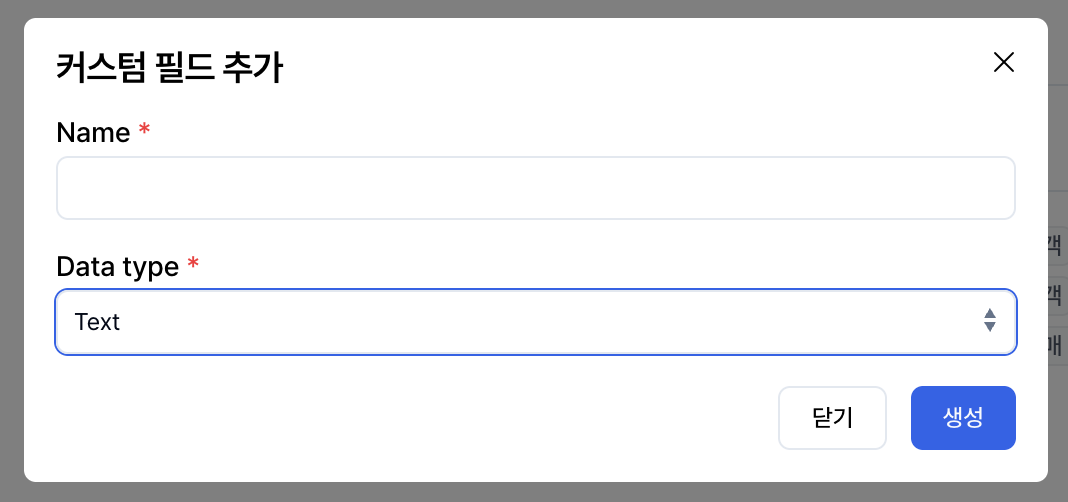
* Custom fields
Forms can use not only basic contact and organization data fields, but also custom fields.
Custom fields can be created in advance on the `Custom Fields` page under `Workspace Settings`, or you can use fields that are automatically created through [Import](import/ai-import).
You can set the response format for each question using the Data type of the added custom field.
* `Text / Multi-line text`: Free-text responses
* `Select`: Multiple-choice selection
* `Number`: Numeric input
* `Date / Datetime`: Date or date-time input
* `URL`: Link input
* `User / Contact`: User or contact selection
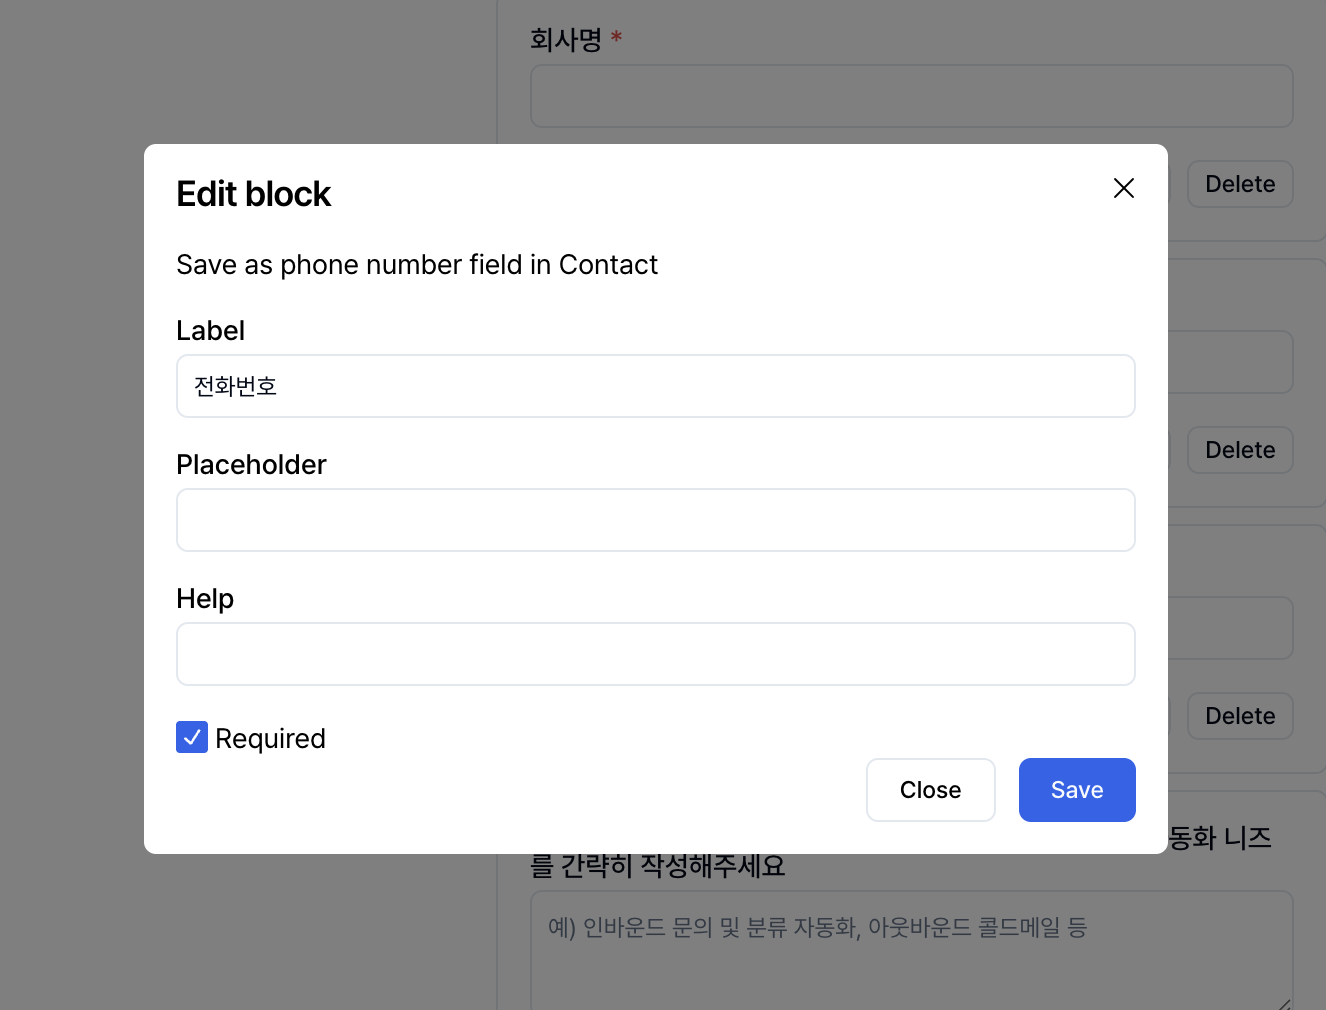
After adding blocks, click the `Edit` button on each block to configure detailed settings.
* Edit block label: Using clear questions helps you collect the information you need.
* Placeholder: Enter example answers to guide responses.
* Help text: Add additional explanations to help respondents better understand the question.
* Set blocks as required or optional
* Reorder blocks: Click and drag to freely adjust block order.
### 2. Managing responses
Responses submitted through the form are automatically saved in the `Responses` tab at the top.
Here, you can view submission times and responses for each lead at a glance and immediately connect them to next actions.
Lead data collected through forms is automatically saved to contact and organization records.
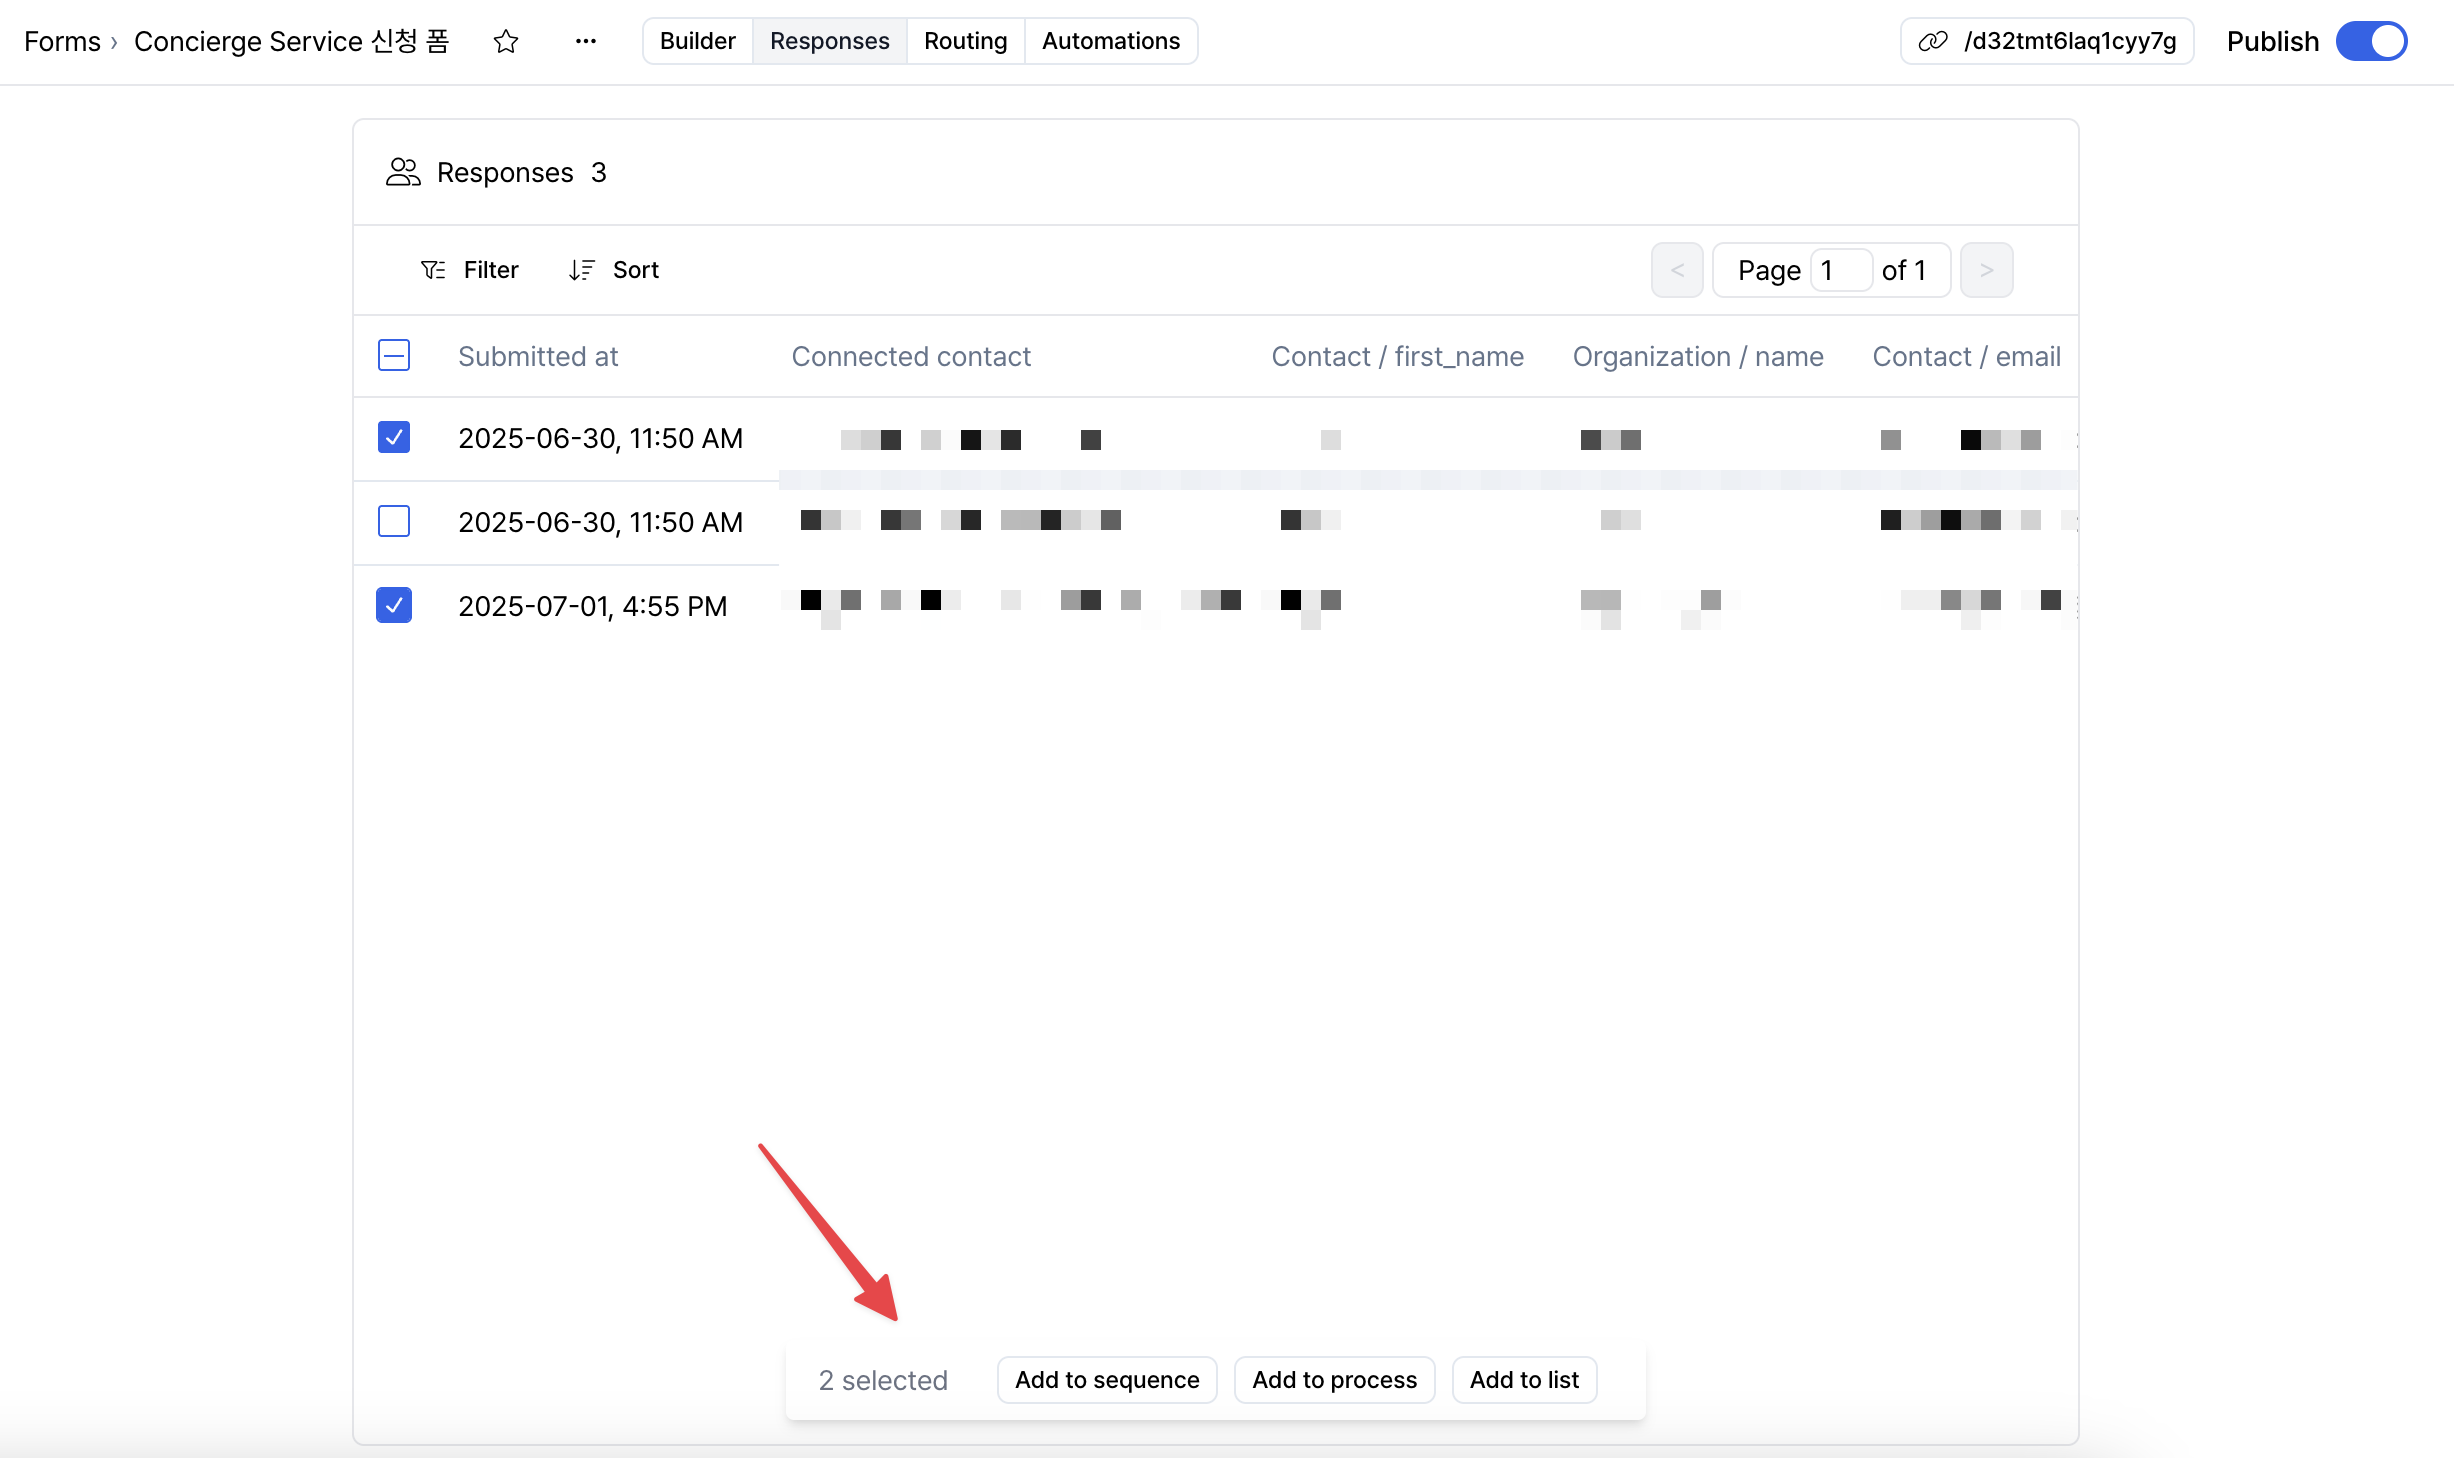
You can select one or multiple leads by clicking the checkboxes. Selected leads can be added to sequences or added to new or existing lists.
Spread allows you to collect the information required for lead qualification using Forms, and export submitted contacts and their responses in CSV or image format.
1. Click the logo in the top-left corner of the screen, then navigate to **Reporting** and click **Add View**.
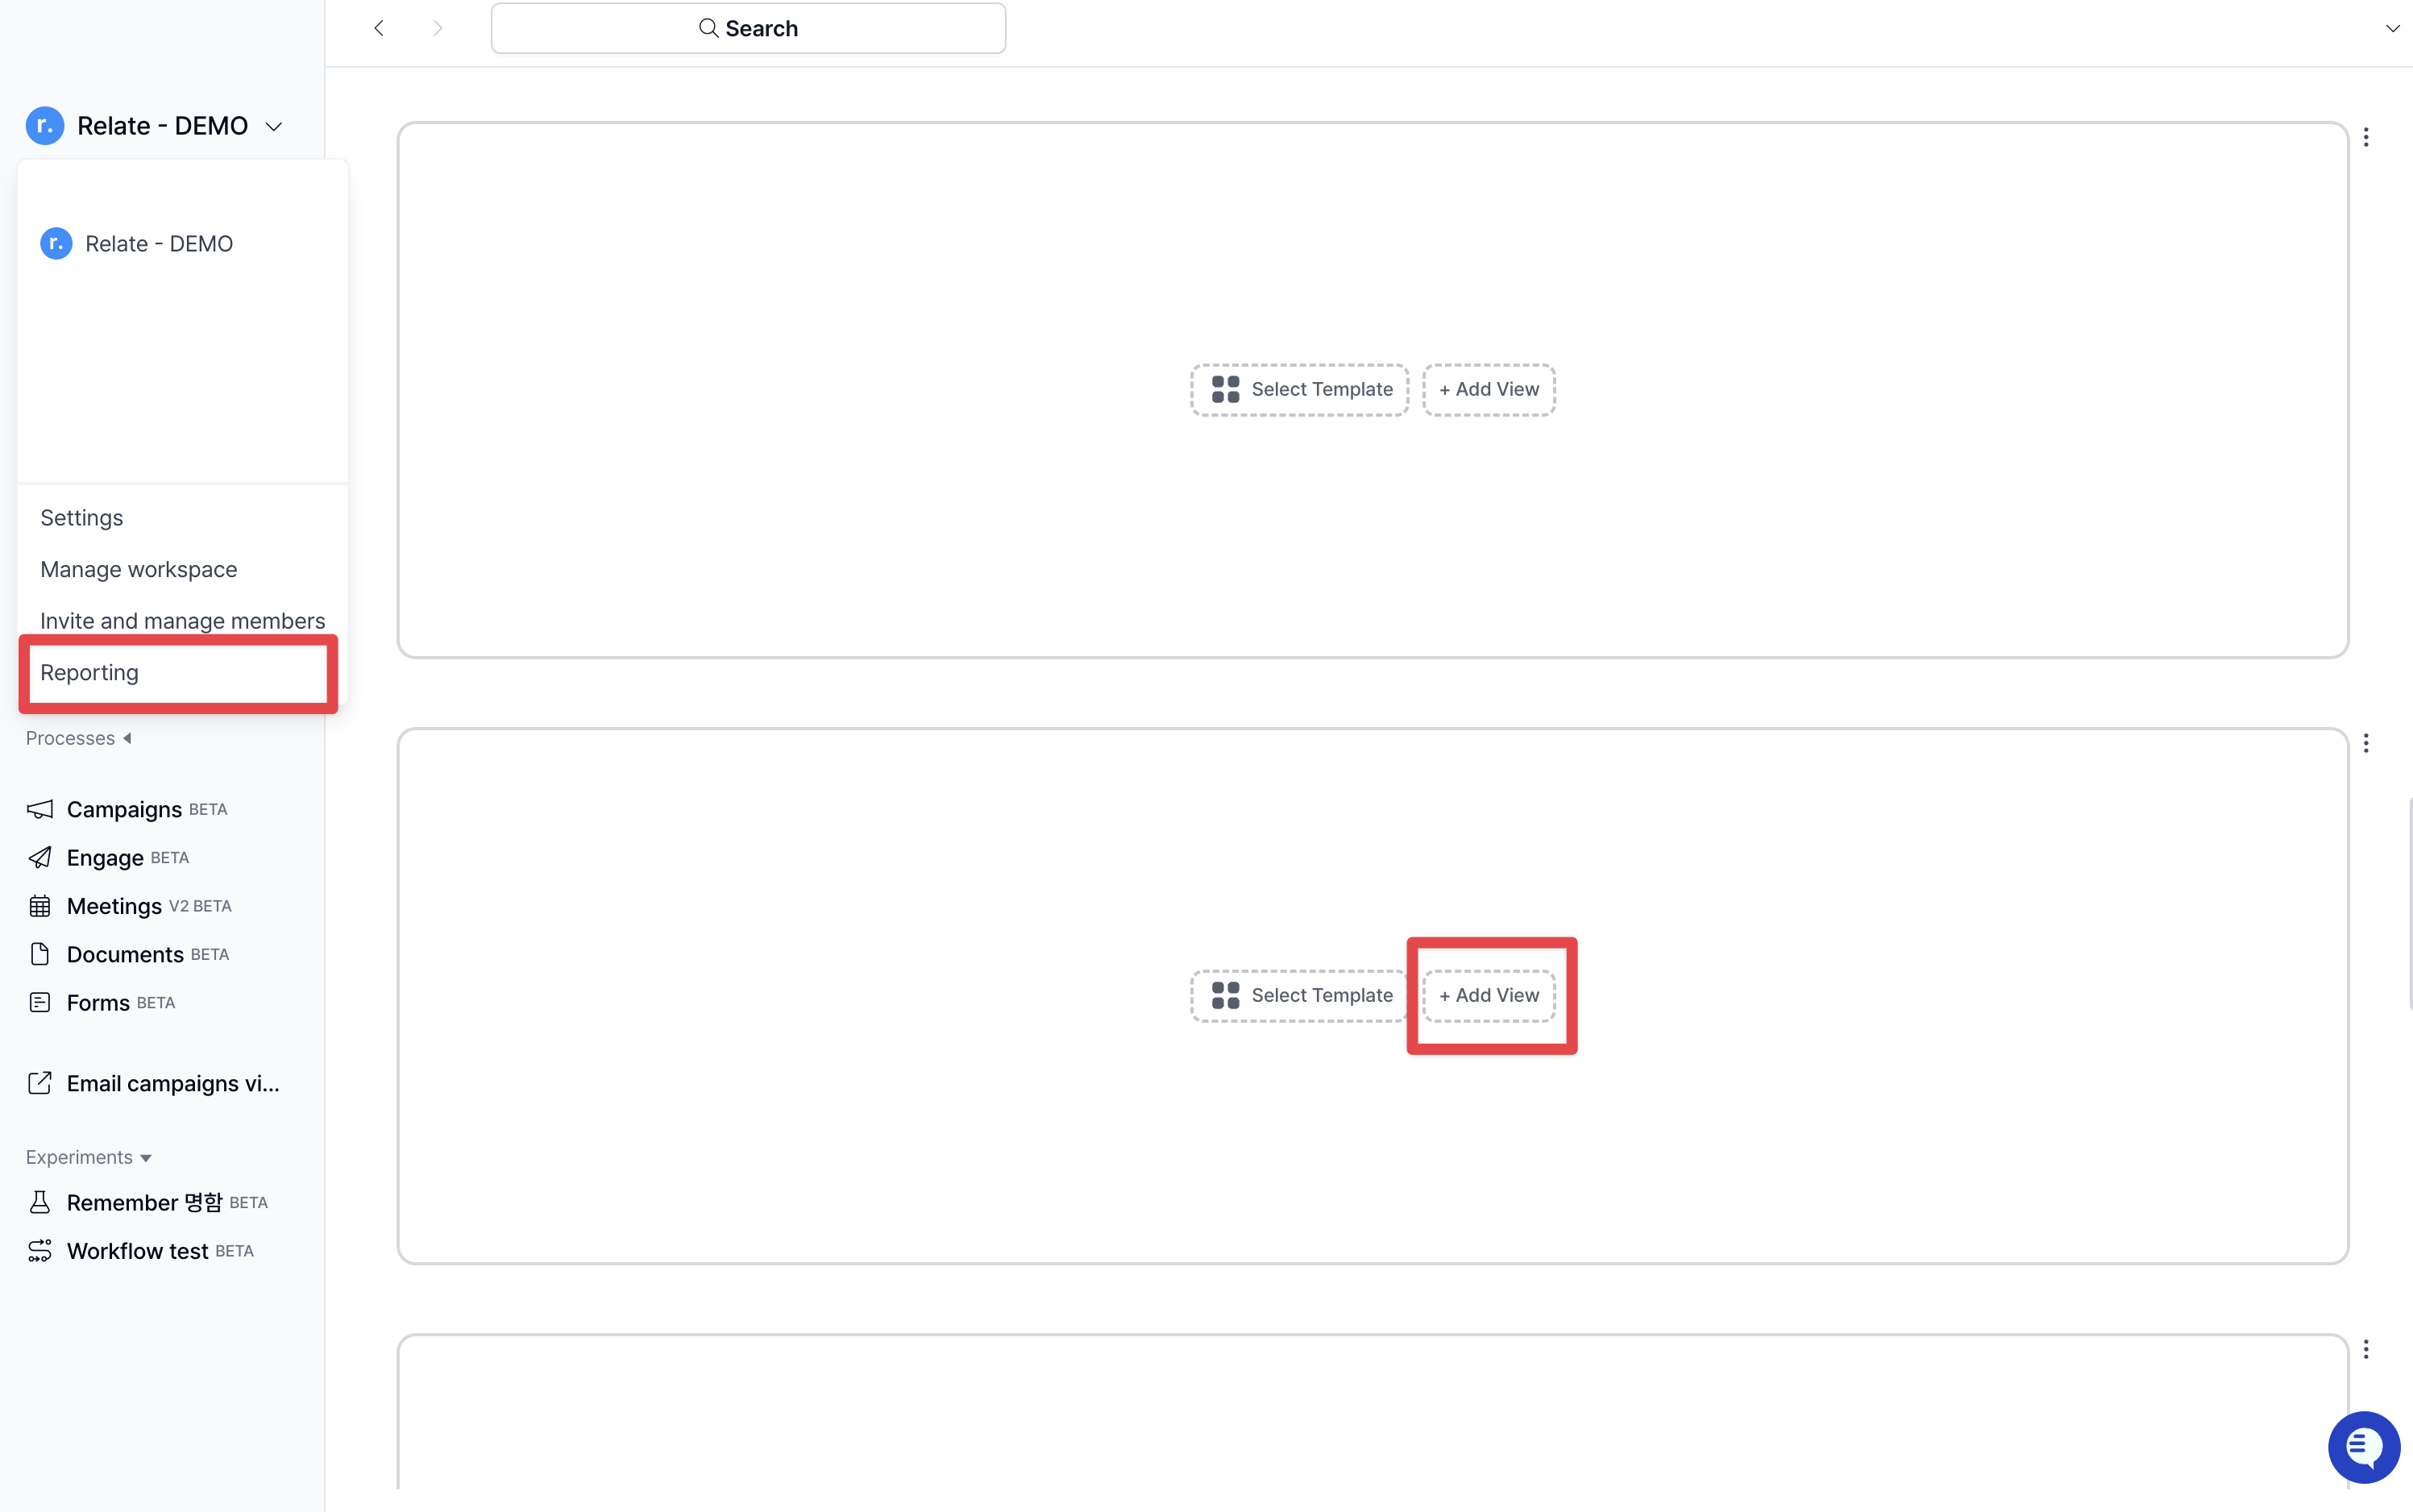
2. Click the **Data** tab in the top-left corner and configure each field as follows.
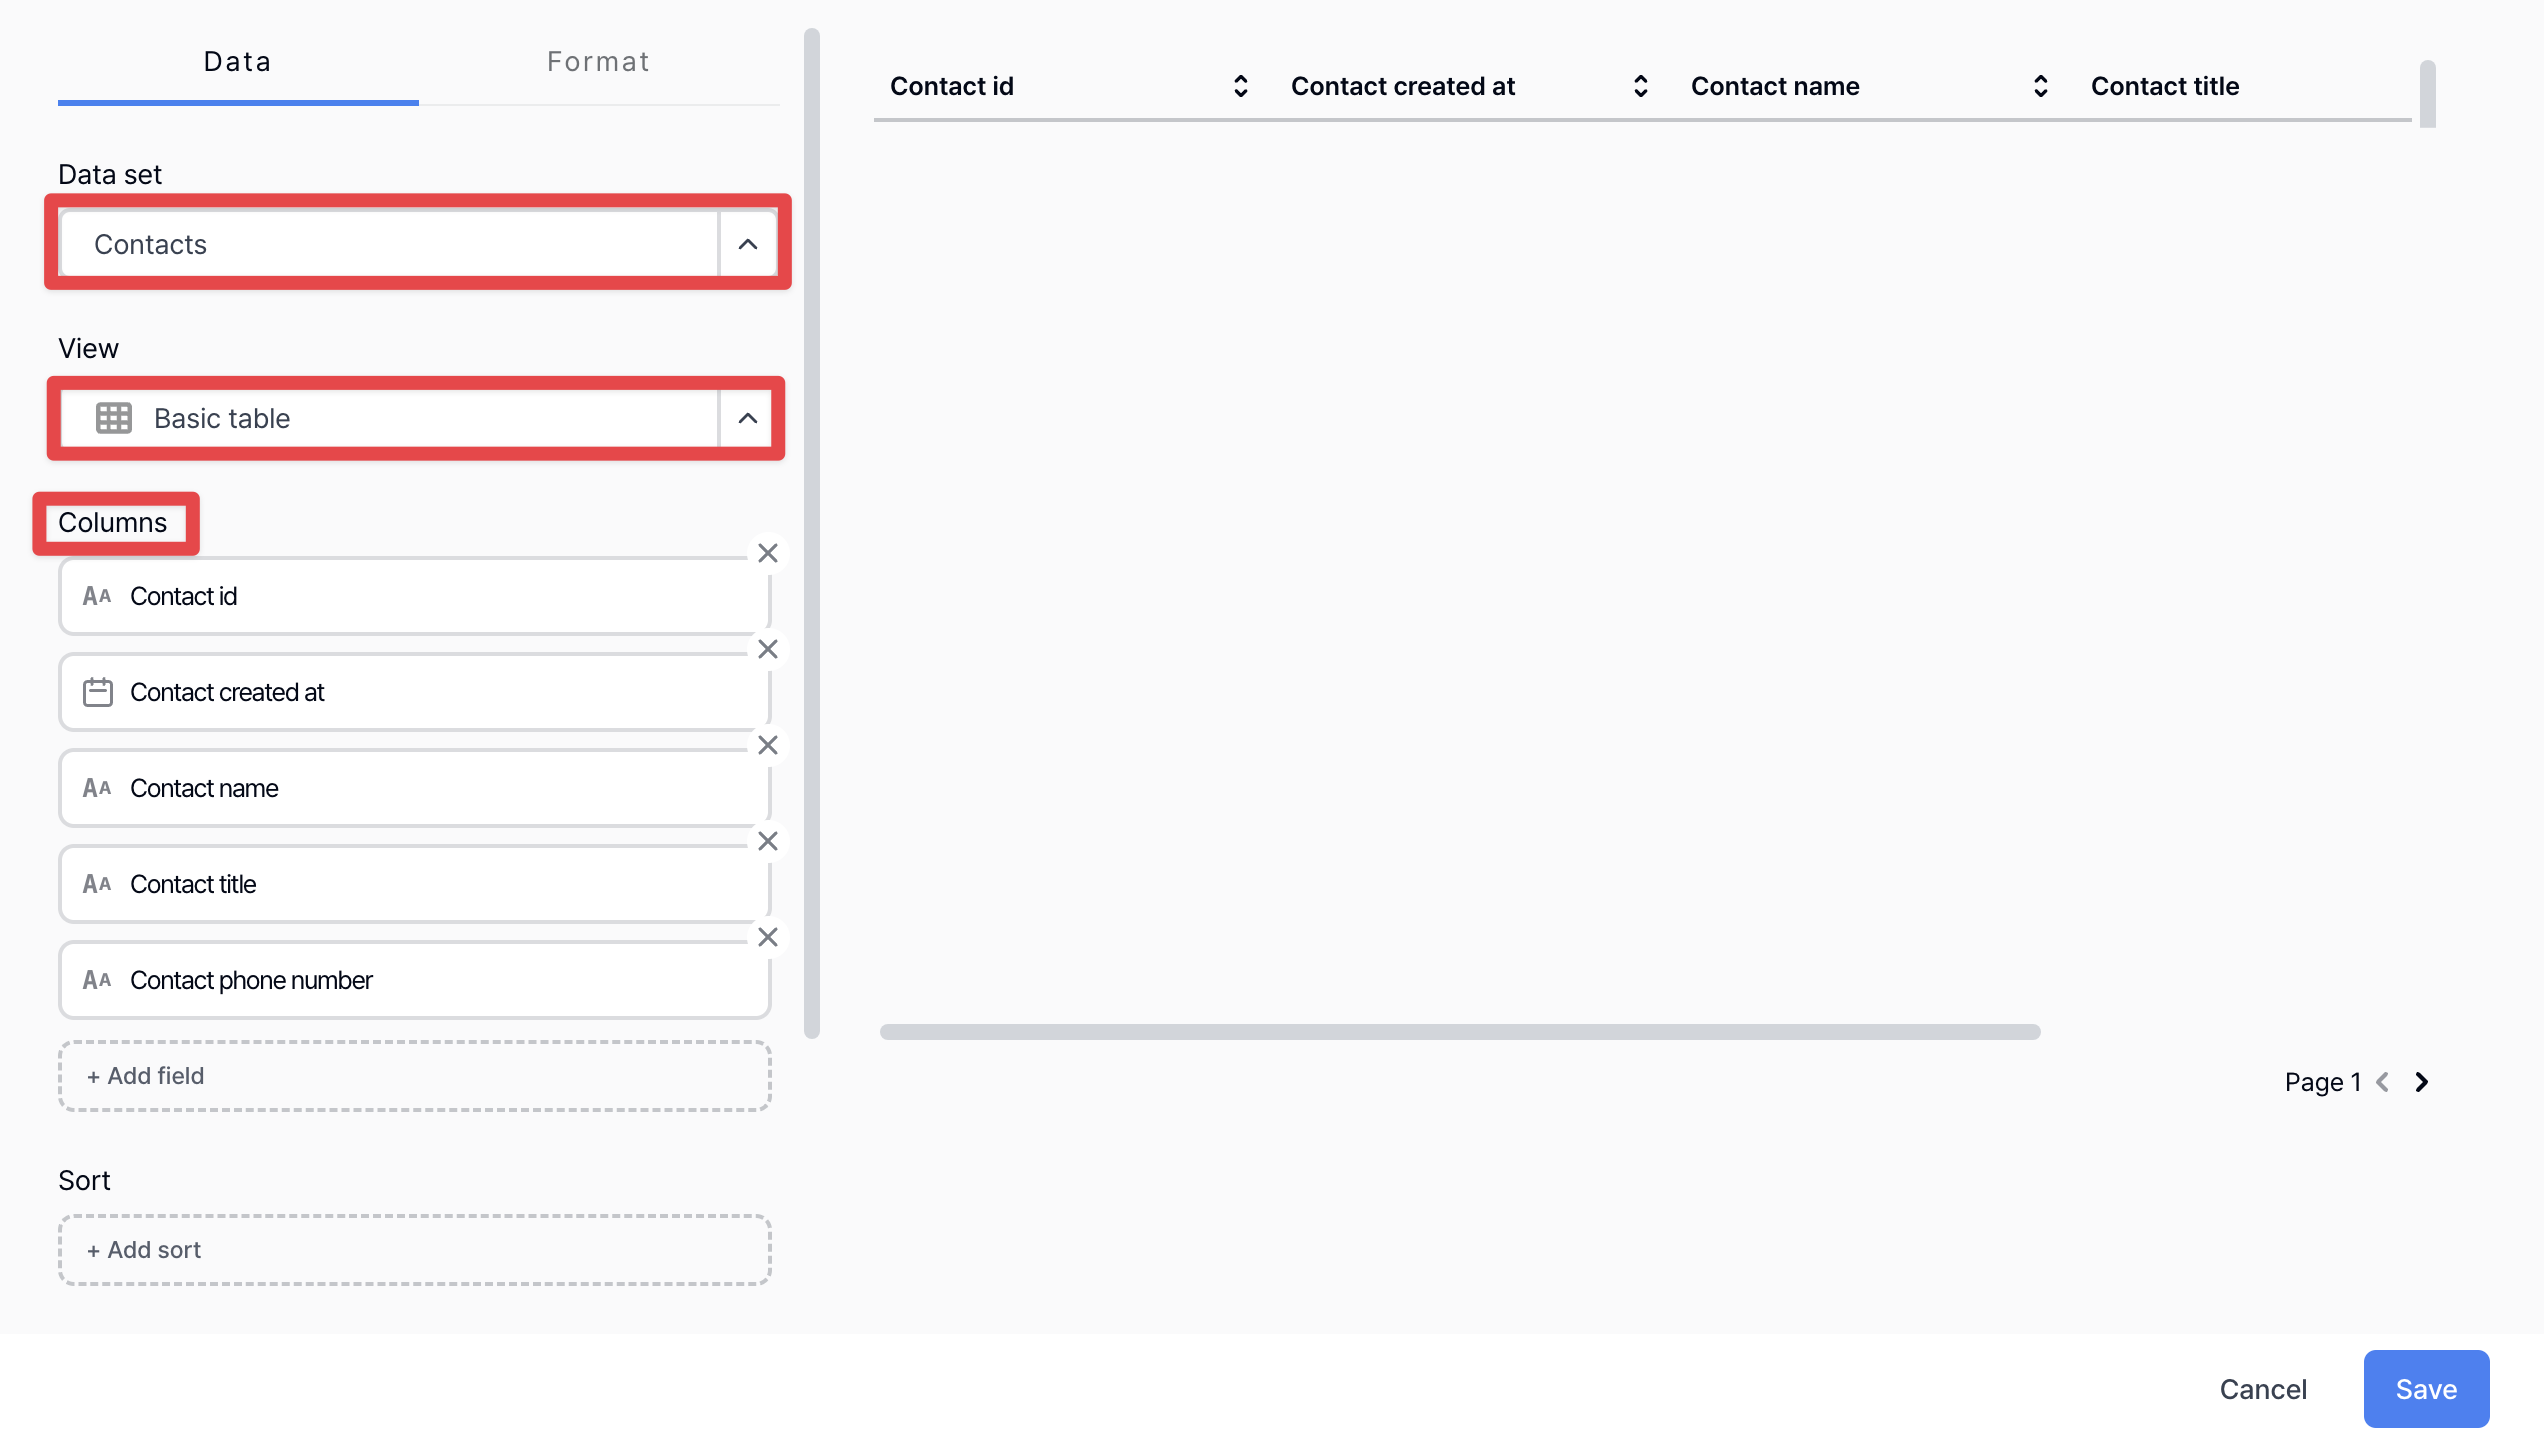
* **Data set:** Contacts
* **View:** Basic table
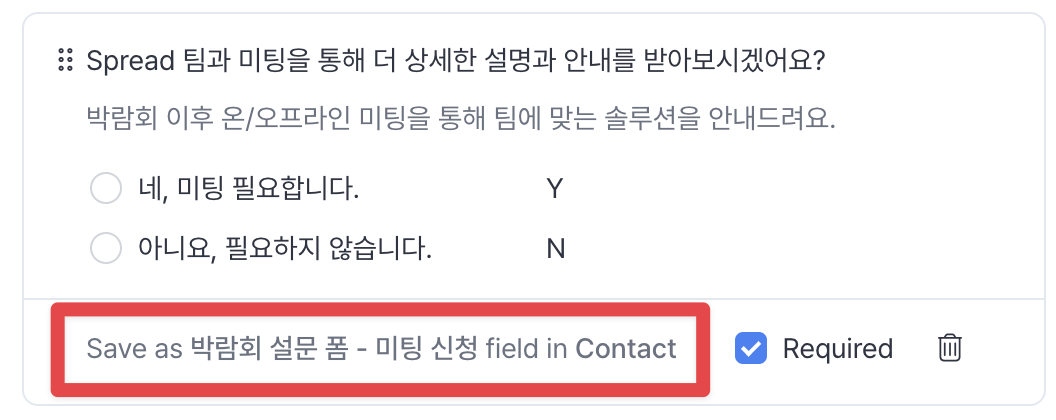
* **Columns:** Select the fields where each form response is stored.\
You can identify these fields by clicking each form question from the left sidebar under **Forms**.\
For example, responses to the question shown in the image below are stored in the `Expo survey form - Meeting request` column of the Contact record.
3. Click **Advanced Options** and configure the fields as follows.
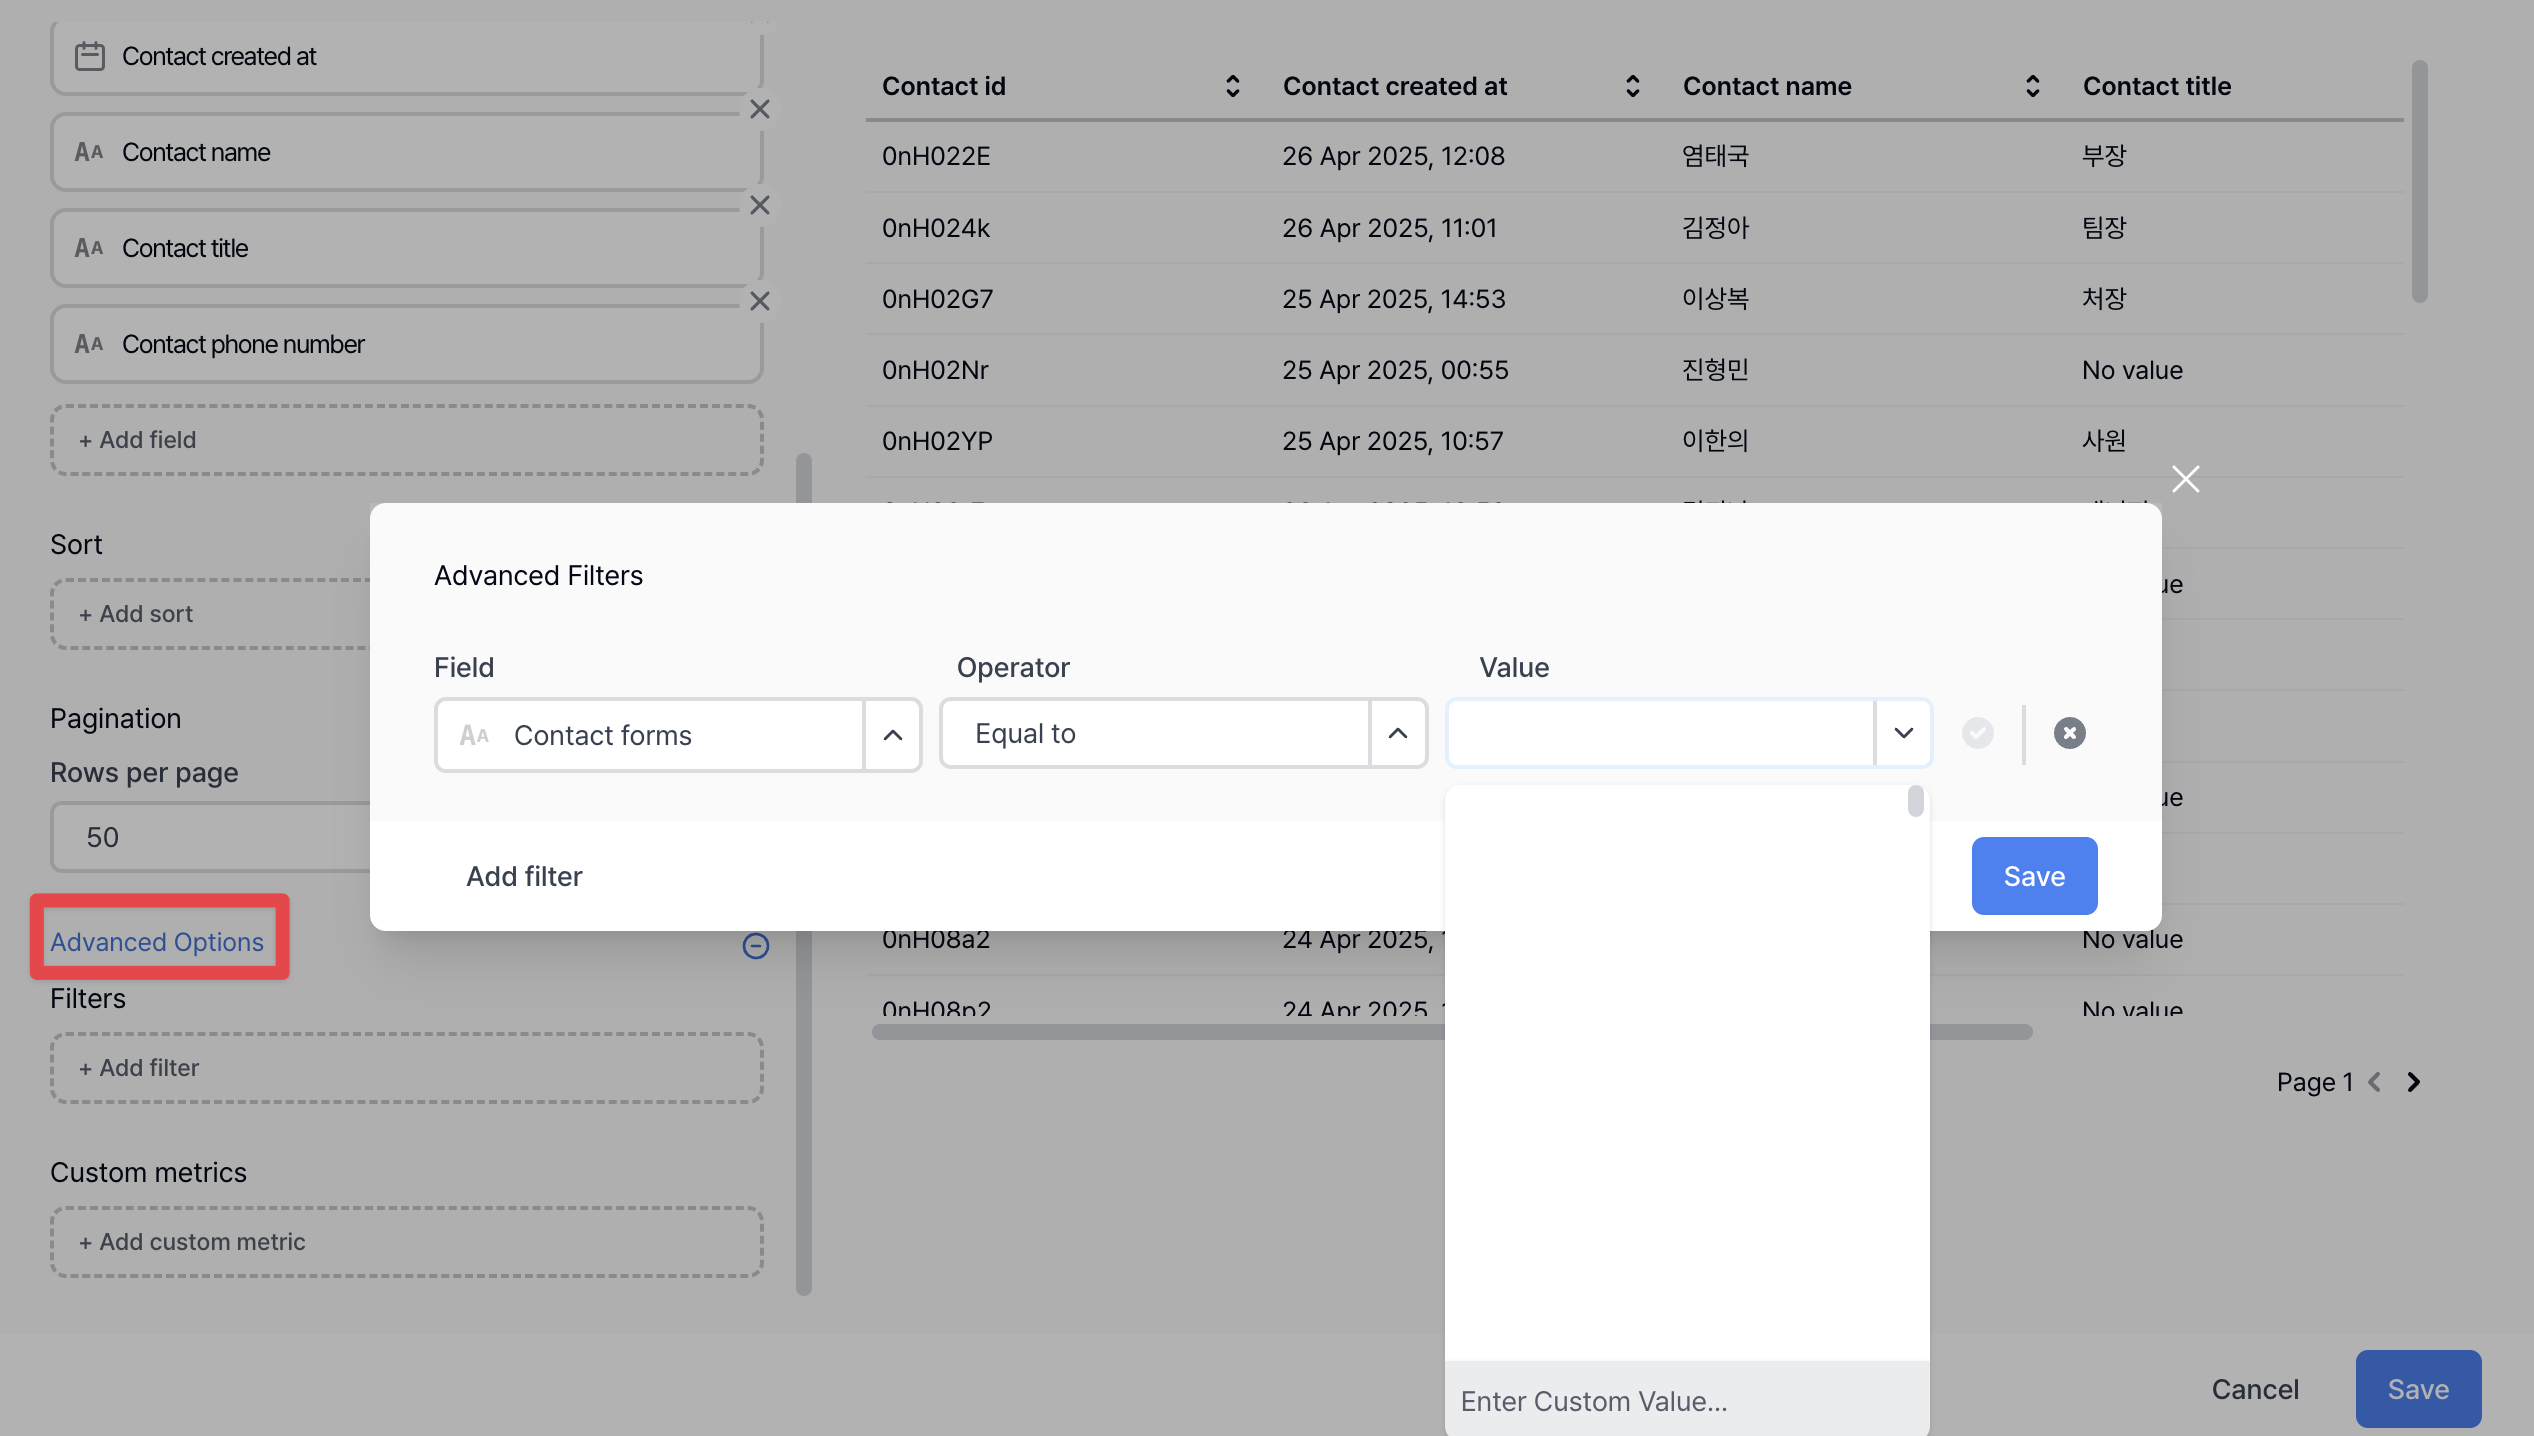
* **Field:** Contact forms
* **Operator:** Equal to
* **Value:** The name of the form you want to export
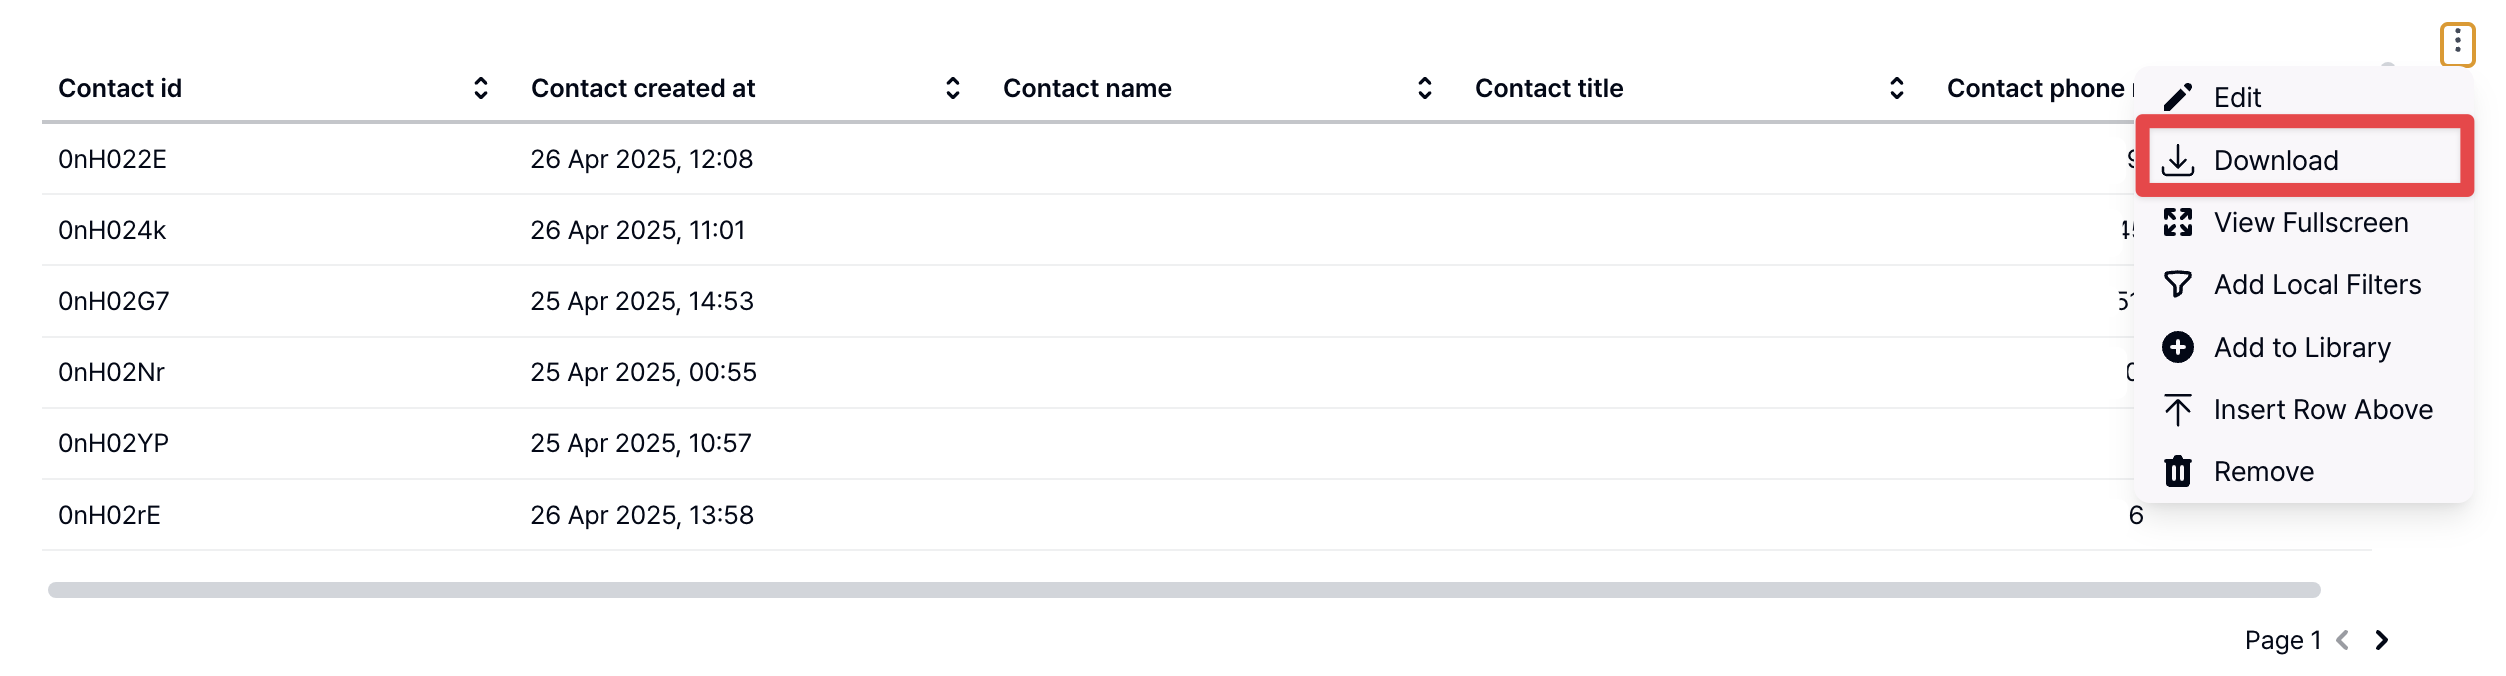
4. Click the three-dot menu in the top-right corner of the dashboard, then select **Download** > **Visible data set**.\
To avoid file corruption, downloading the file in Excel (.xlsx) format is recommended.
### 3. Routing settings
In the `Routing` tab at the top, you can configure which page is shown after a lead submits a form.
Depending on your settings, leads can be redirected to a calendar, document, or a specific page URL to continue the next action.
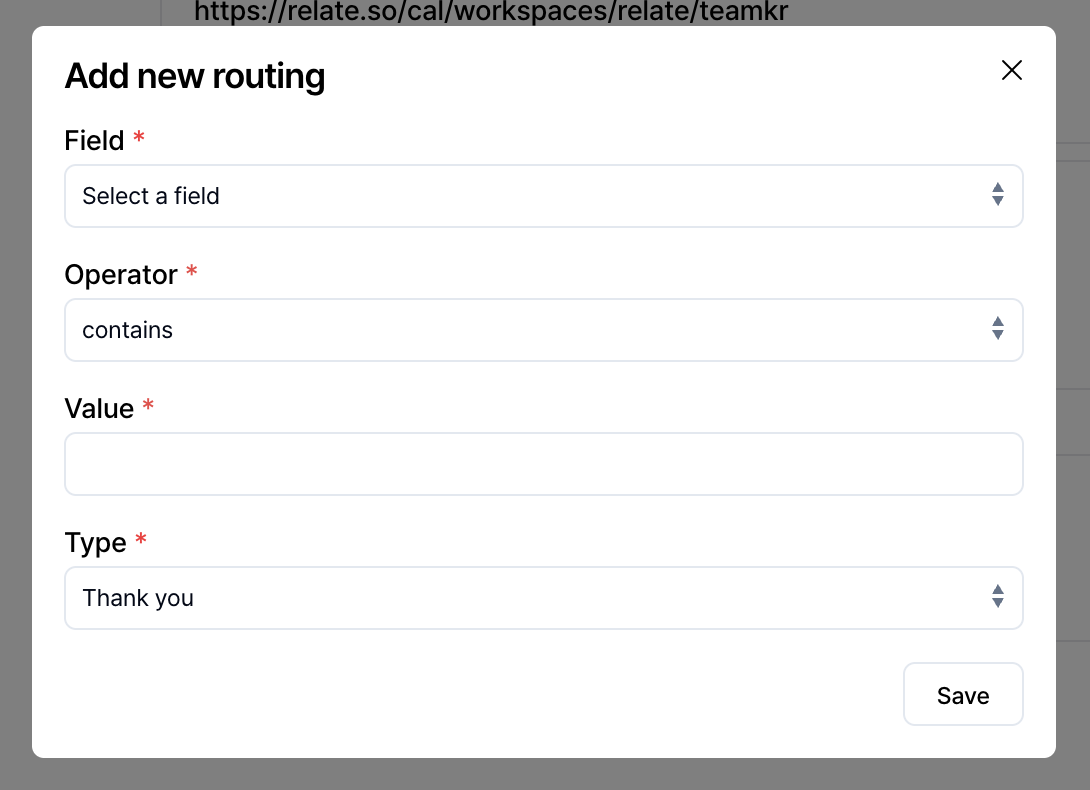
#### Adding routing
When you click the `+ Add routing` button on the right,
you can set conditional post-submission destinations based on lead responses as shown below.
* **Field**
* Select the form response field (block) used as the routing condition.
* (e.g.) Organization name, email, multiple-choice question, custom question
* **Operator**
* Set how the selected field should be compared.
* Conditions such as contains, does not contain, is, is not, is empty, is not empty can be used.
* **Value**
* Enter the value to be used in the condition.
* (e.g.) Organization name contains “Spread”
* **Type**
* Select the type of page to redirect to when the condition is met.
* Thank you: Default thank-you page
* URL: Redirect to a specific external or internal page to encourage further engagement
* Documents: Redirect to the [Documents](/docs/docs) page to share additional resources
* Meetings: Redirect to the [Meeting Scheduler](/docs/meetings) page to allow meeting booking
When routing conditions are met, leads are automatically redirected to the configured page after form submission,
allowing them to naturally continue to the next action such as viewing documents or booking meetings.
If routing is not configured, users are redirected to the default "Thank you" page.
### 4. Automations
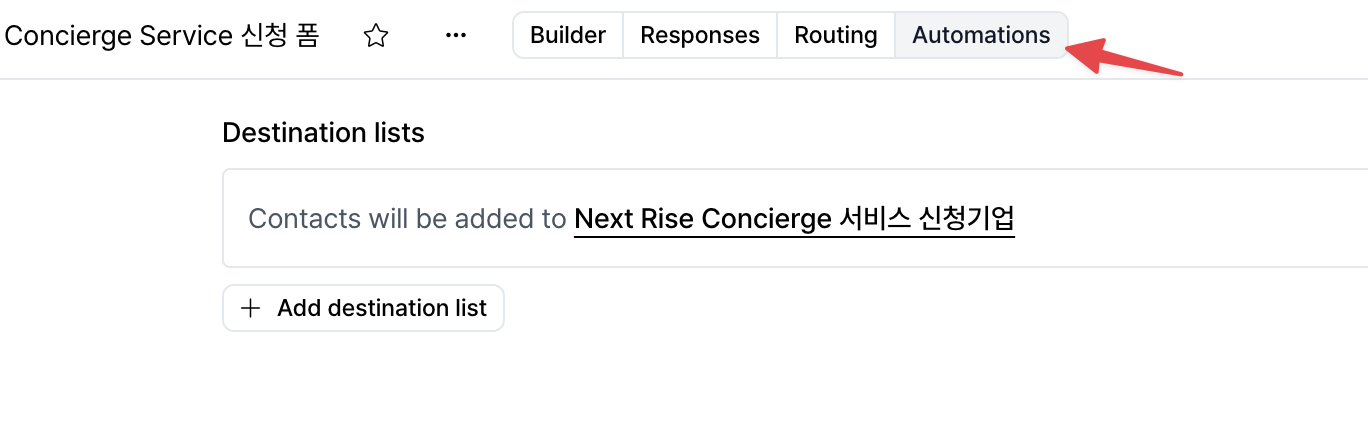
In the `Automations` tab at the top, you can automatically add leads who meet specific conditions among form respondents to lists.
This allows you to automate follow-up actions after form submission.
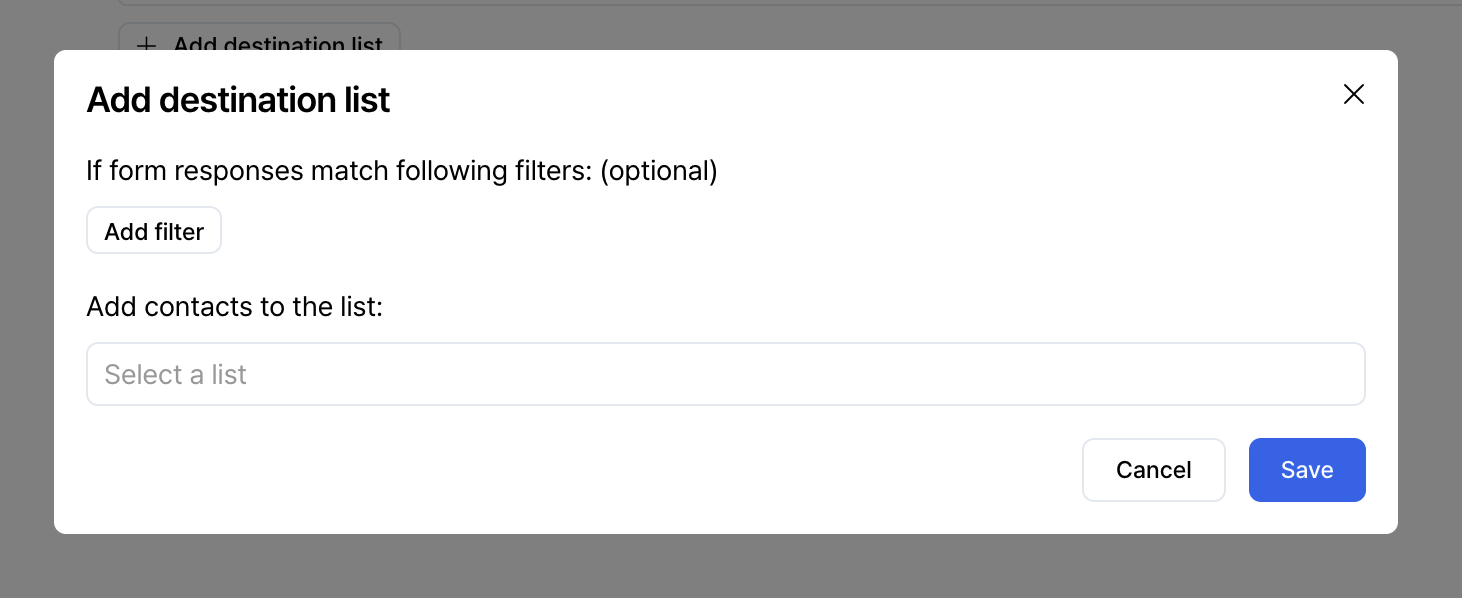
Click the `+ Add destination list` button to set conditions based on form response data.
* You can configure leads to be added to a list only when form responses meet specific conditions.
* (e.g.) Submitted At is after a specific date
* (e.g.) A specific response value is not empty
* (e.g.) If no conditions are set, all form respondents are included
* Leads that meet the conditions are automatically added to the selected list.
* This destination list can be used later as the source list for triggered campaigns or sequences.
In other words, you can automatically build a flow of **Form submission → Condition filtering → Add to destination list → Run triggered campaign/sequence**, allowing you to select only engaged leads and automate follow-up communication.
If you want to learn more about form automation and list-based email sending,
please refer to the guide below.\
👉 [View the Spread | Emma Automation Guide](emma-features)
After creating a form, you can share the generated link on your website, in emails, or on social media to collect leads.
***
## Level up your sales and marketing with Forms
* **Lead capture and qualification**: With Forms, you can collect key lead information, communicate with potential customers, and automatically identify Sales Qualified Leads (SQL).
* **Simplified routing**: Easily guide potential customers to the next stage of your pipeline with simple routing after form submission, such as meeting booking, resource sharing, or redirection to specific content.
* **Subscriber list building**: Build a newsletter subscriber base and provide product updates to potential customers.
* **Asset sharing**: Share or allow downloads of marketing resources such as whitepapers and reports after form submission.
* **Drive campaign engagement**: Embed forms tailored to your team’s processes into email campaigns, social media posts, and landing pages to capture more leads and drive engagement.
Spread’s Forms feature automates the key steps of lead capture, qualification, and routing to simplify inbound sales and marketing. Start using Forms today to build efficient workflows.