> ## Documentation Index
> Fetch the complete documentation index at: https://www.spread.so/docs/llms.txt
> Use this file to discover all available pages before exploring further.
# Feature Details
> Learn the key features and details of Spread | Emma.
## Overview
On this page, we will look at the basic set of Spread | Emma automation and the three elements that make it up.
We also explain step by step how to actually connect automation sets
to set up a single automation flow.
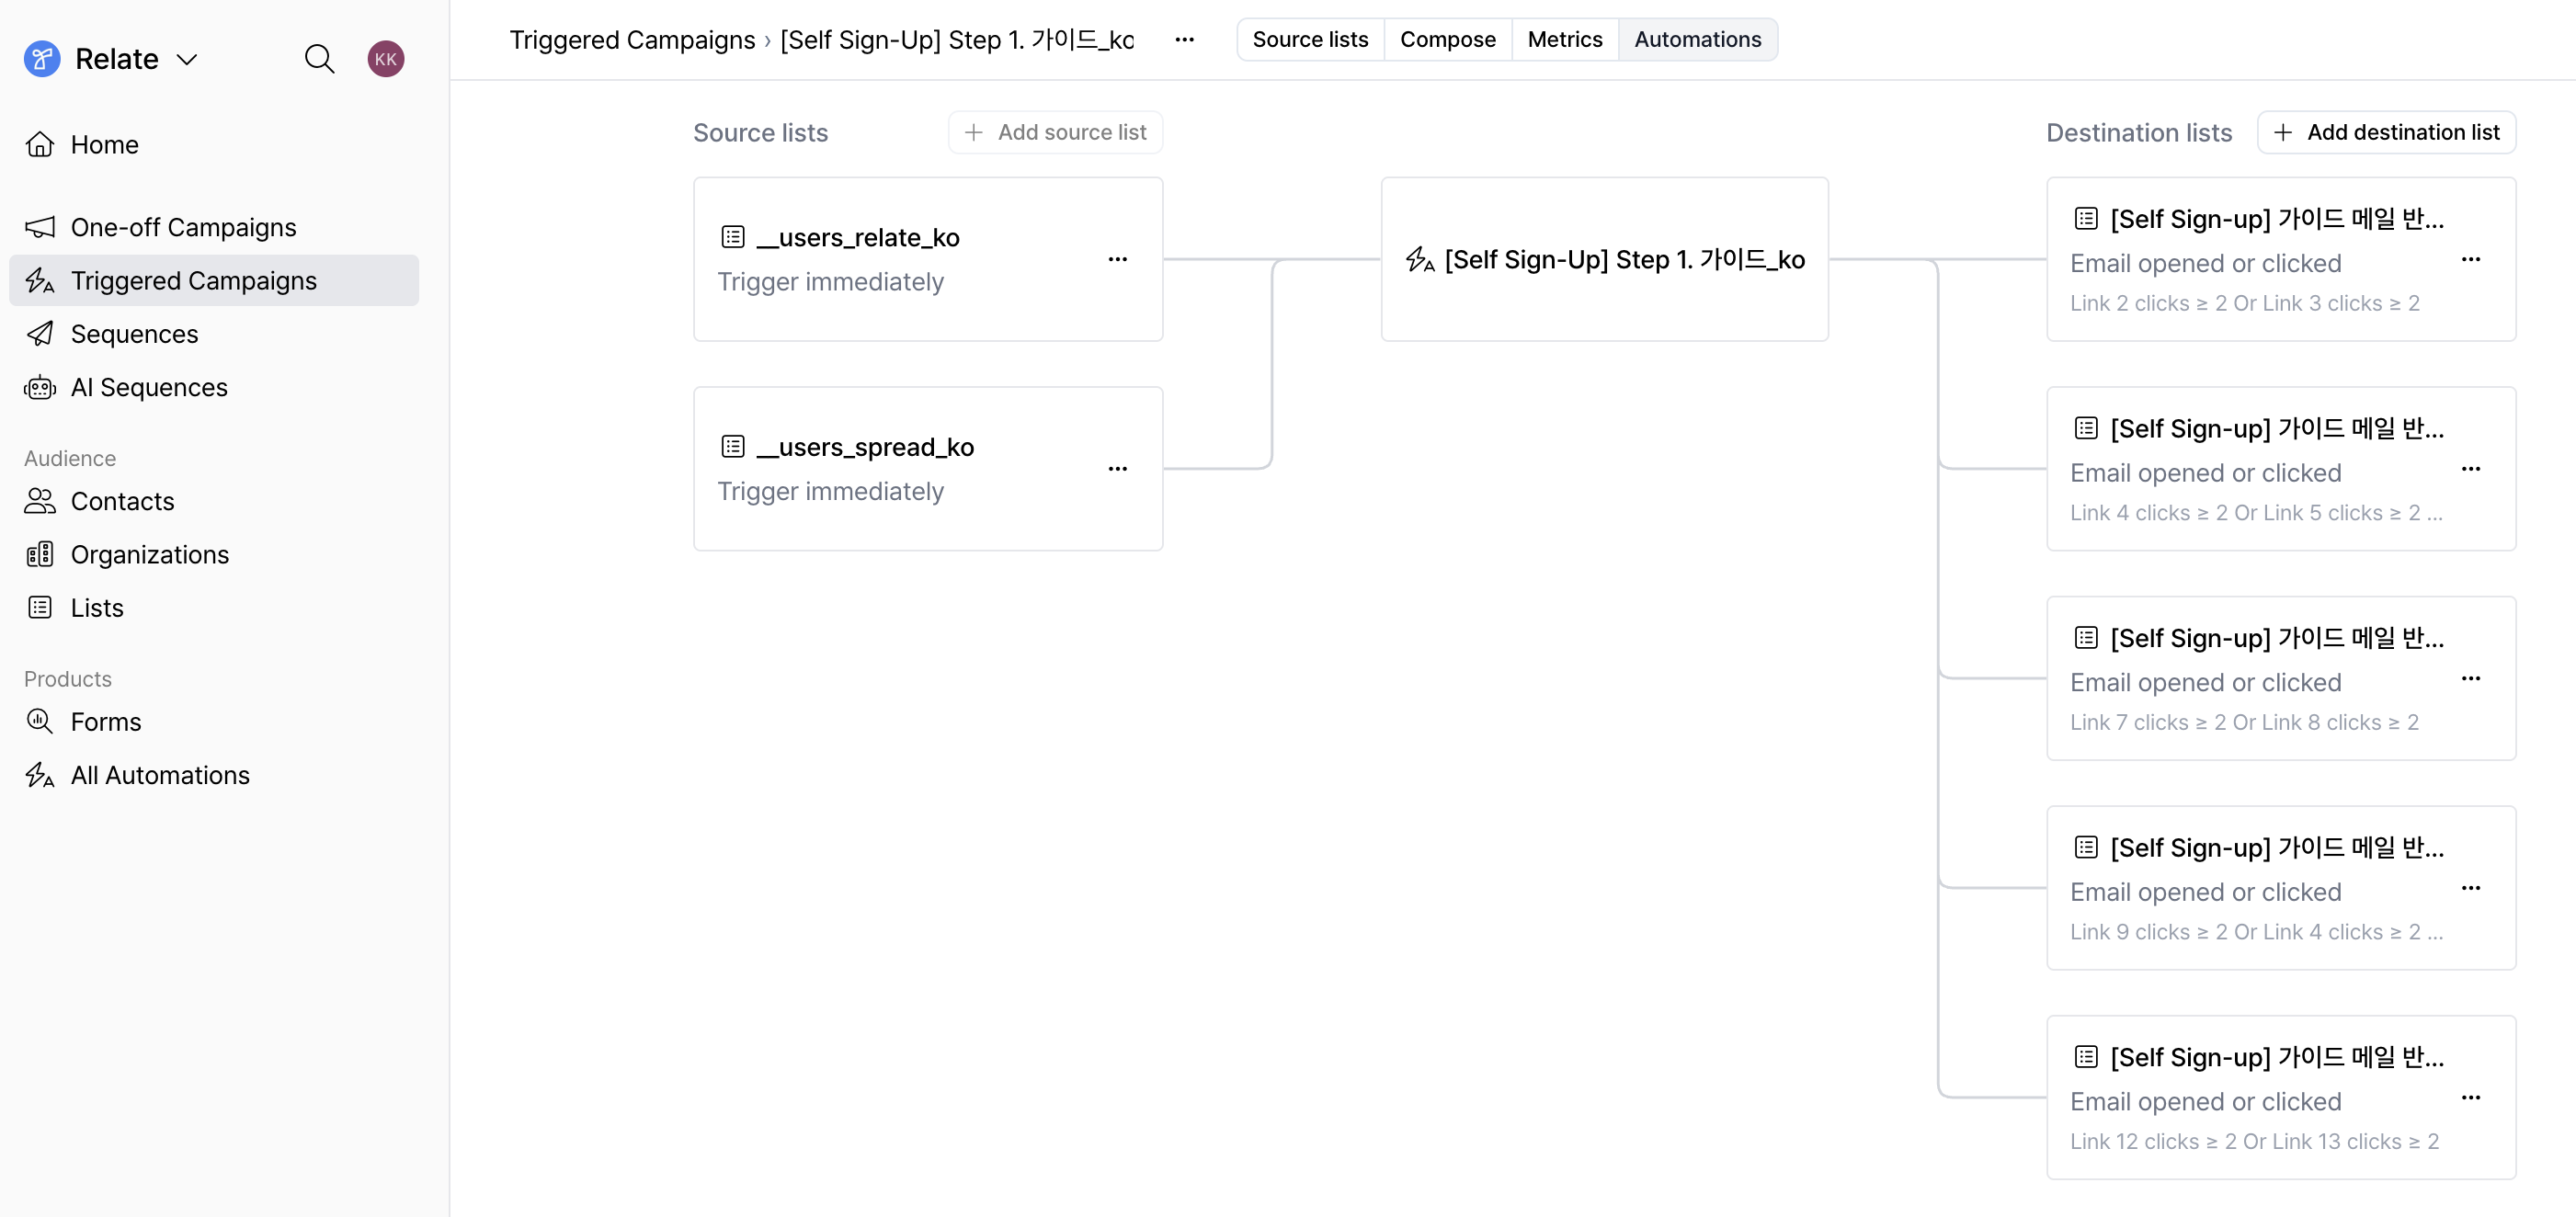
***
## The basic set of Spread | Emma automation
All of Emma’s automations run by repeating the following basic set.
List → Email → List
A single automation set consists of the following three elements.
1. **Source list** : A list where the target leads to receive emails are collected
2. [**Email**](/docs/spread-email-types): Triggered Campaigns or Sequences
3. **Destination list**: The next list that leads move to based on email responses
In this structure, lists are always positioned before and after emails, and Emma is designed to expand by connecting these sets.
For example, you can design automation in the following flow.
|
Source list
|
Triggered Campaign
|
Destination list
|
Sequence
|
|
New lead list acquired through the Contact Us form
|
Automatically send onboarding content such as product introductions, usage guides, and key feature overviews
|
Classify leads who opened the onboarding email or clicked links into a separate interest list
|
The owner sends personal emails to interested leads to propose meetings and continue follow-ups
|
By connecting the List → Email → List structure step by step like this,
you can create a flow that naturally continues from automated guidance to 1:1 sales based on lead responses.
Through this, even if leads receive the same email, they proceed to different next flows depending on their responses.
***
## The three elements that make up an automation set
Let’s take a look at the roles of lists, triggered campaigns, and sequences that make up the automation set above.
### 1. List
A list is a set of customer records created using contacts and organizations. In Emma, it is both the starting point of automation and the connection point to move to the next step.
* Every lead belongs to at least one list.
* All email sending is based on the **Source list**.
* Leads that satisfy pre-configured conditions automatically move to the **Destination list**.
### 2. Triggered Campaign
A [triggered campaign](/docs/spread-email-types#triggered-campaigns) is a campaign in which pre-written emails are automatically sent when a lead is added to a list.
It is mainly used as an automated email for inbound responses.
Emma sends triggered campaigns based on the source list, and after sending, it can classify leads and automatically create new lists based on the following **lead email responses**.
✔️ Whether the email was opened
✔️ Whether a link was clicked
✔️ Whether unsubscribed
### 3. Sequence
A [sequence](/docs/spread-email-types#sequences) is an individual email flow that continues the conversation with a lead.
It is mainly used to continue follow-up communication assuming a lead response.
Emma sends sequences based on the source list, and in sequences, it can reclassify leads and automatically create new lists based on **whether the lead replied**.
✔️ Replied
✔️ No reply : The no-reply 기준 is set to 7 days by default, and can be changed to fit the team on each sequence settings page.
***
## Setting up an automation flow \[Step-by-Step]
#### Step 1. Write the email to be sent automatically
On the One-off Campaigns, Triggered Campaigns, or Sequences page, refer to the [Send an Email](/docs/send-email) guide and write the email content first.
#### Step 2. Prepare the source list to begin automation
The written email must be connected to a source list to be sent. You can prepare a source list in the following two ways.
1. **Add manually**: Select an existing contact list and add it to the list
2. [**Connect form responses**](/docs/forms#forms-162): Set up so that responses coming in through a form are automatically added to the list
#### Step 3. Connect the source list in the Automation tab
If you click the `Automations` tab at the top, you can set the lists to be connected before and after a single email.
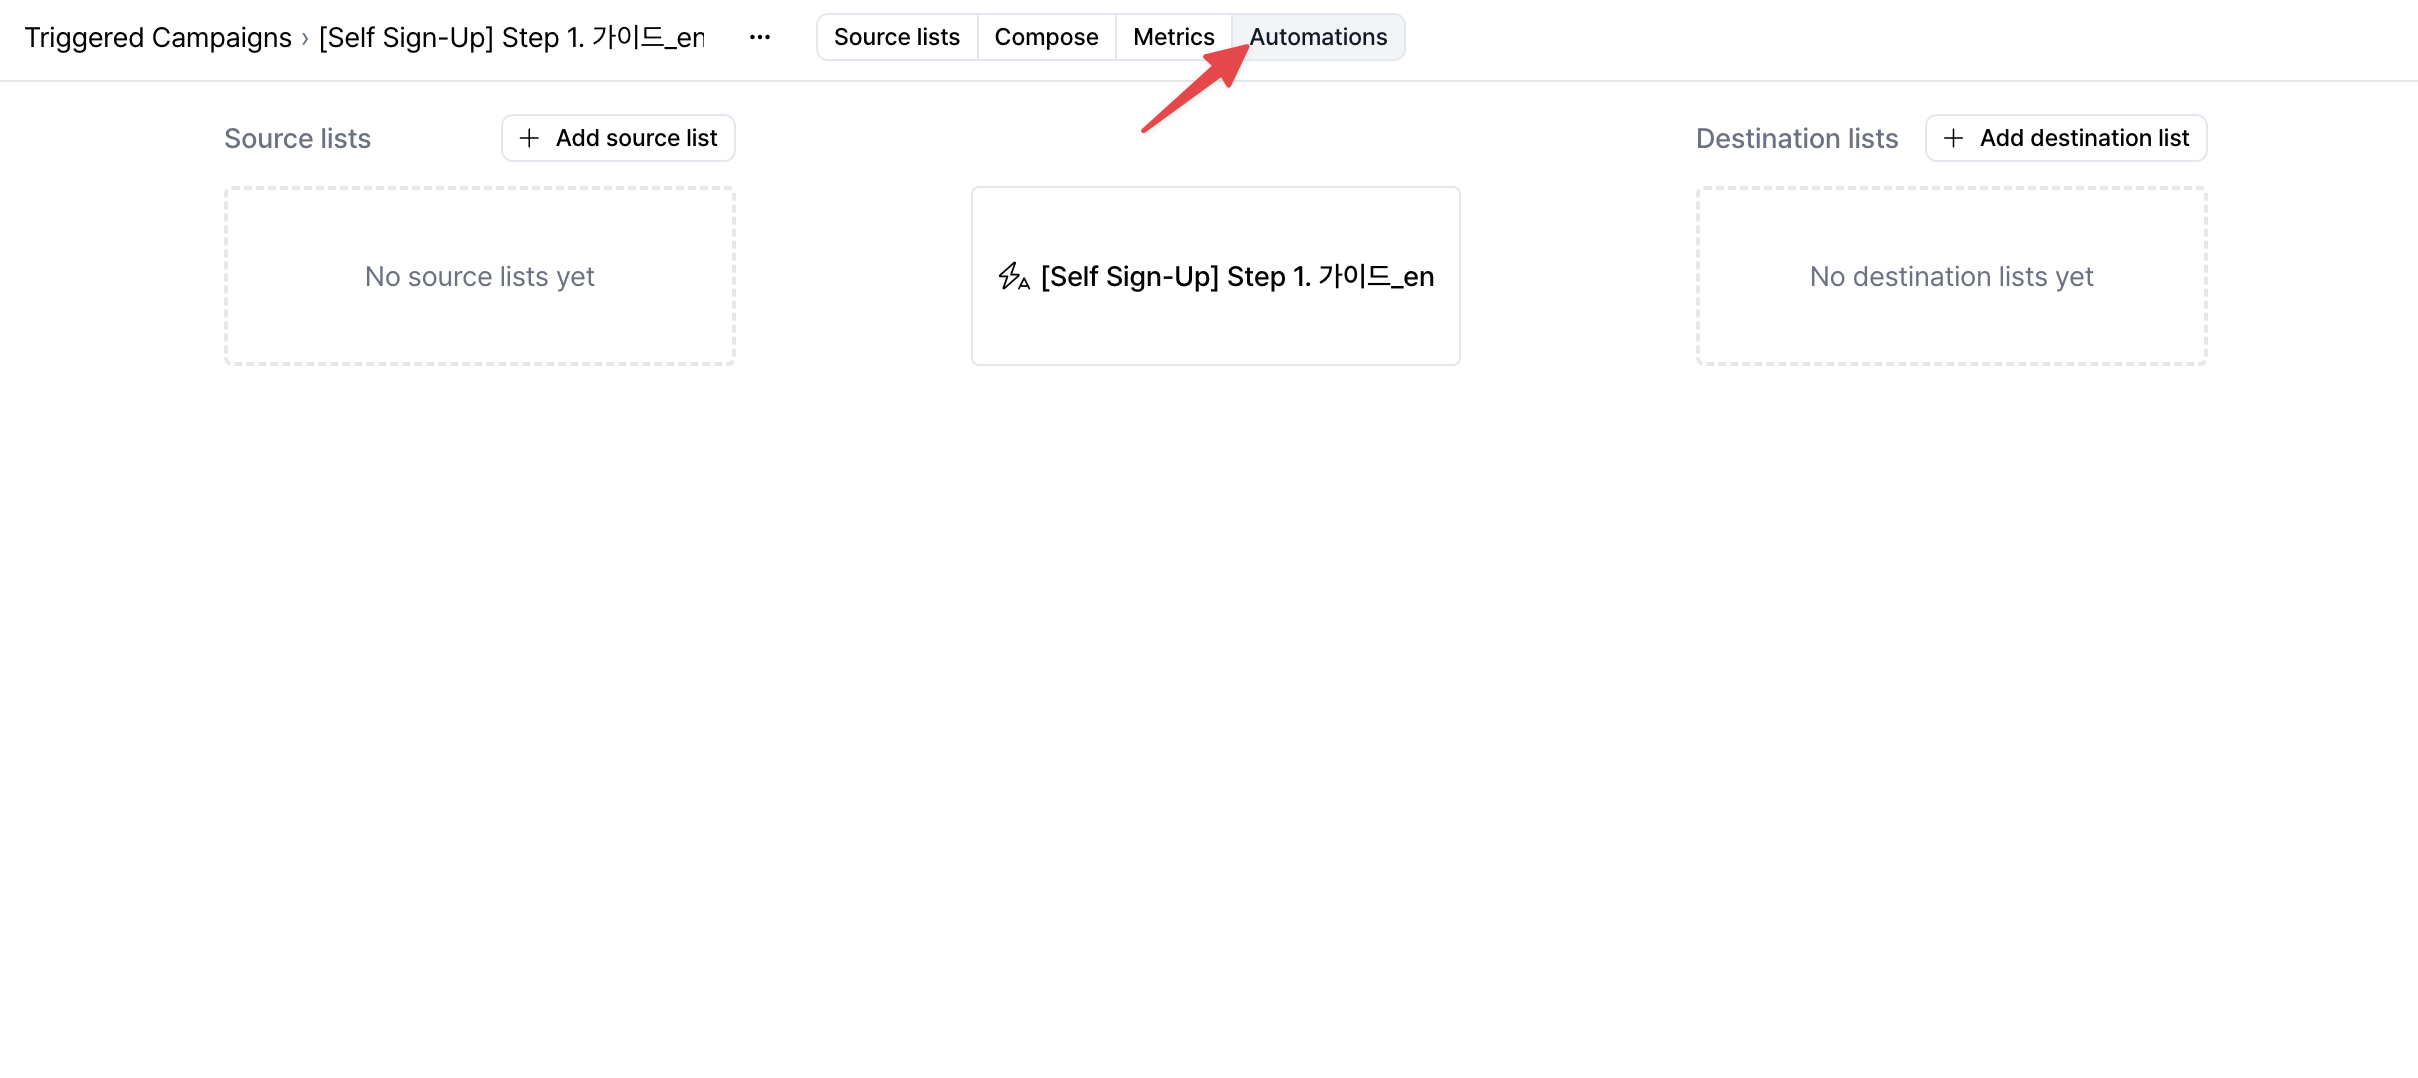 If you click the `+ Add source list` button to add a source list, the connected email will be sent automatically.
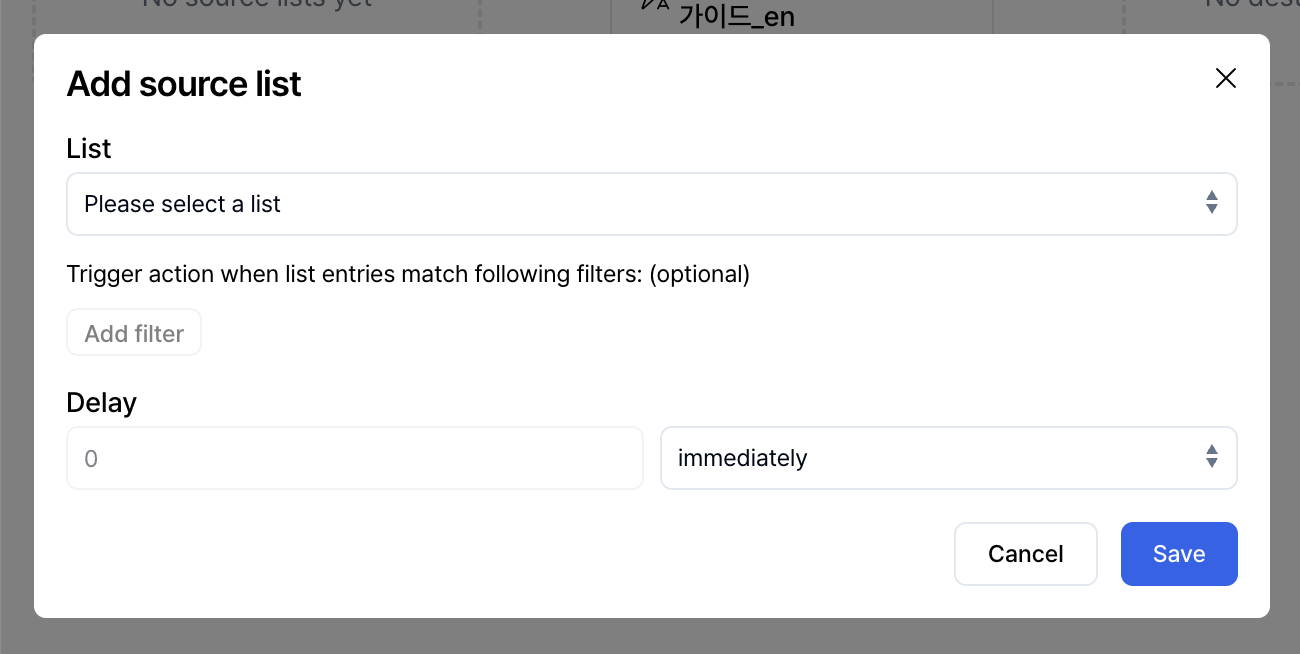 When adding a source list, you can configure the following items together.
**(1) Select list** : Select the list to start automation. Automation runs when a contact is added to the selected list.
**(2) Add filters** : If needed, you can set automation to run only for items that satisfy specific conditions within the selected list. For example, you can refine the targets for automation execution, such as when a contact name contains certain characters or when filtering based on a specific field.
**(3) Delay (Send timing)** : Set when to send the email after an item is added to the list.
* Send immediately (immediately)
* Send after a certain time (hours, days)
#### Step 4. Add a destination list and set response conditions
You can set a destination list that leads will move to based on their responses to the email. This is a list that leads move to only when they satisfy specific responses and conditions.
Click the `+ Add destination list` button to add a destination list.
When adding a source list, you can configure the following items together.
**(1) Select list** : Select the list to start automation. Automation runs when a contact is added to the selected list.
**(2) Add filters** : If needed, you can set automation to run only for items that satisfy specific conditions within the selected list. For example, you can refine the targets for automation execution, such as when a contact name contains certain characters or when filtering based on a specific field.
**(3) Delay (Send timing)** : Set when to send the email after an item is added to the list.
* Send immediately (immediately)
* Send after a certain time (hours, days)
#### Step 4. Add a destination list and set response conditions
You can set a destination list that leads will move to based on their responses to the email. This is a list that leads move to only when they satisfy specific responses and conditions.
Click the `+ Add destination list` button to add a destination list.
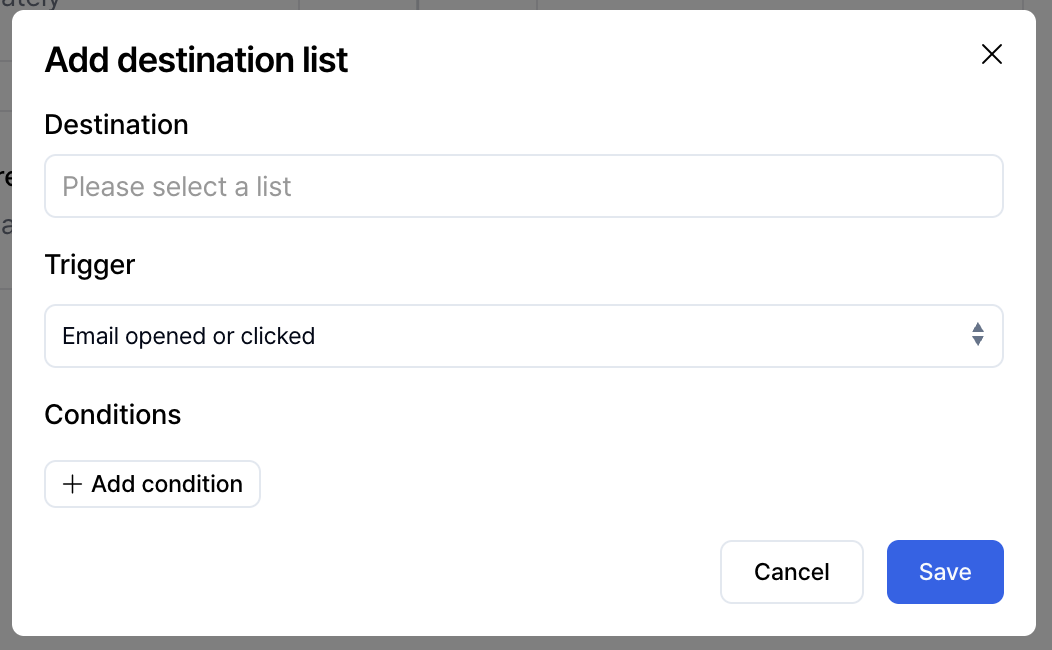 When adding a destination list, configure the following items together.
**(1) Select list** : Select the list that leads will move to when they satisfy the configured conditions.
**(2) Trigger** : Select which email engagement will move contacts into the destination list.
* When the email is opened/clicked
* When unsubscribed
**(3) Add conditions** : If needed, add conditions so that leads move to the destination list only when they satisfy specific criteria even within the selected trigger.
* Email open count is greater than or equal to a certain number
* Total email click count is greater than or equal to a certain number
* Clicked a specific link a certain number of times
When adding a destination list, configure the following items together.
**(1) Select list** : Select the list that leads will move to when they satisfy the configured conditions.
**(2) Trigger** : Select which email engagement will move contacts into the destination list.
* When the email is opened/clicked
* When unsubscribed
**(3) Add conditions** : If needed, add conditions so that leads move to the destination list only when they satisfy specific criteria even within the selected trigger.
* Email open count is greater than or equal to a certain number
* Total email click count is greater than or equal to a certain number
* Clicked a specific link a certain number of times
By using destination lists, even if leads receive the same email, you can naturally branch into different next flows depending on their responses.
#### Step 5. The destination list becomes the starting point of the next automation set
Leads that meet the conditions move to the configured destination list, and this list can again be used as the source list for the next automation.
Spread’s automation flows aren’t limited to a single screen and can be configured not only on One-off Campaigns, Triggered Campaigns, and Sequences pages, but also on the **Lists page**.
Through the `Automations` tab at the top of each page,
you can configure an automation flow in the same way that continues from
**Source list → Email → Destination list**.
No matter which screen you configure it on, the automation works the same way,
and you can conveniently manage automation on the page that fits your current work context.
***
## Visual structure of the entire Emma automation flow
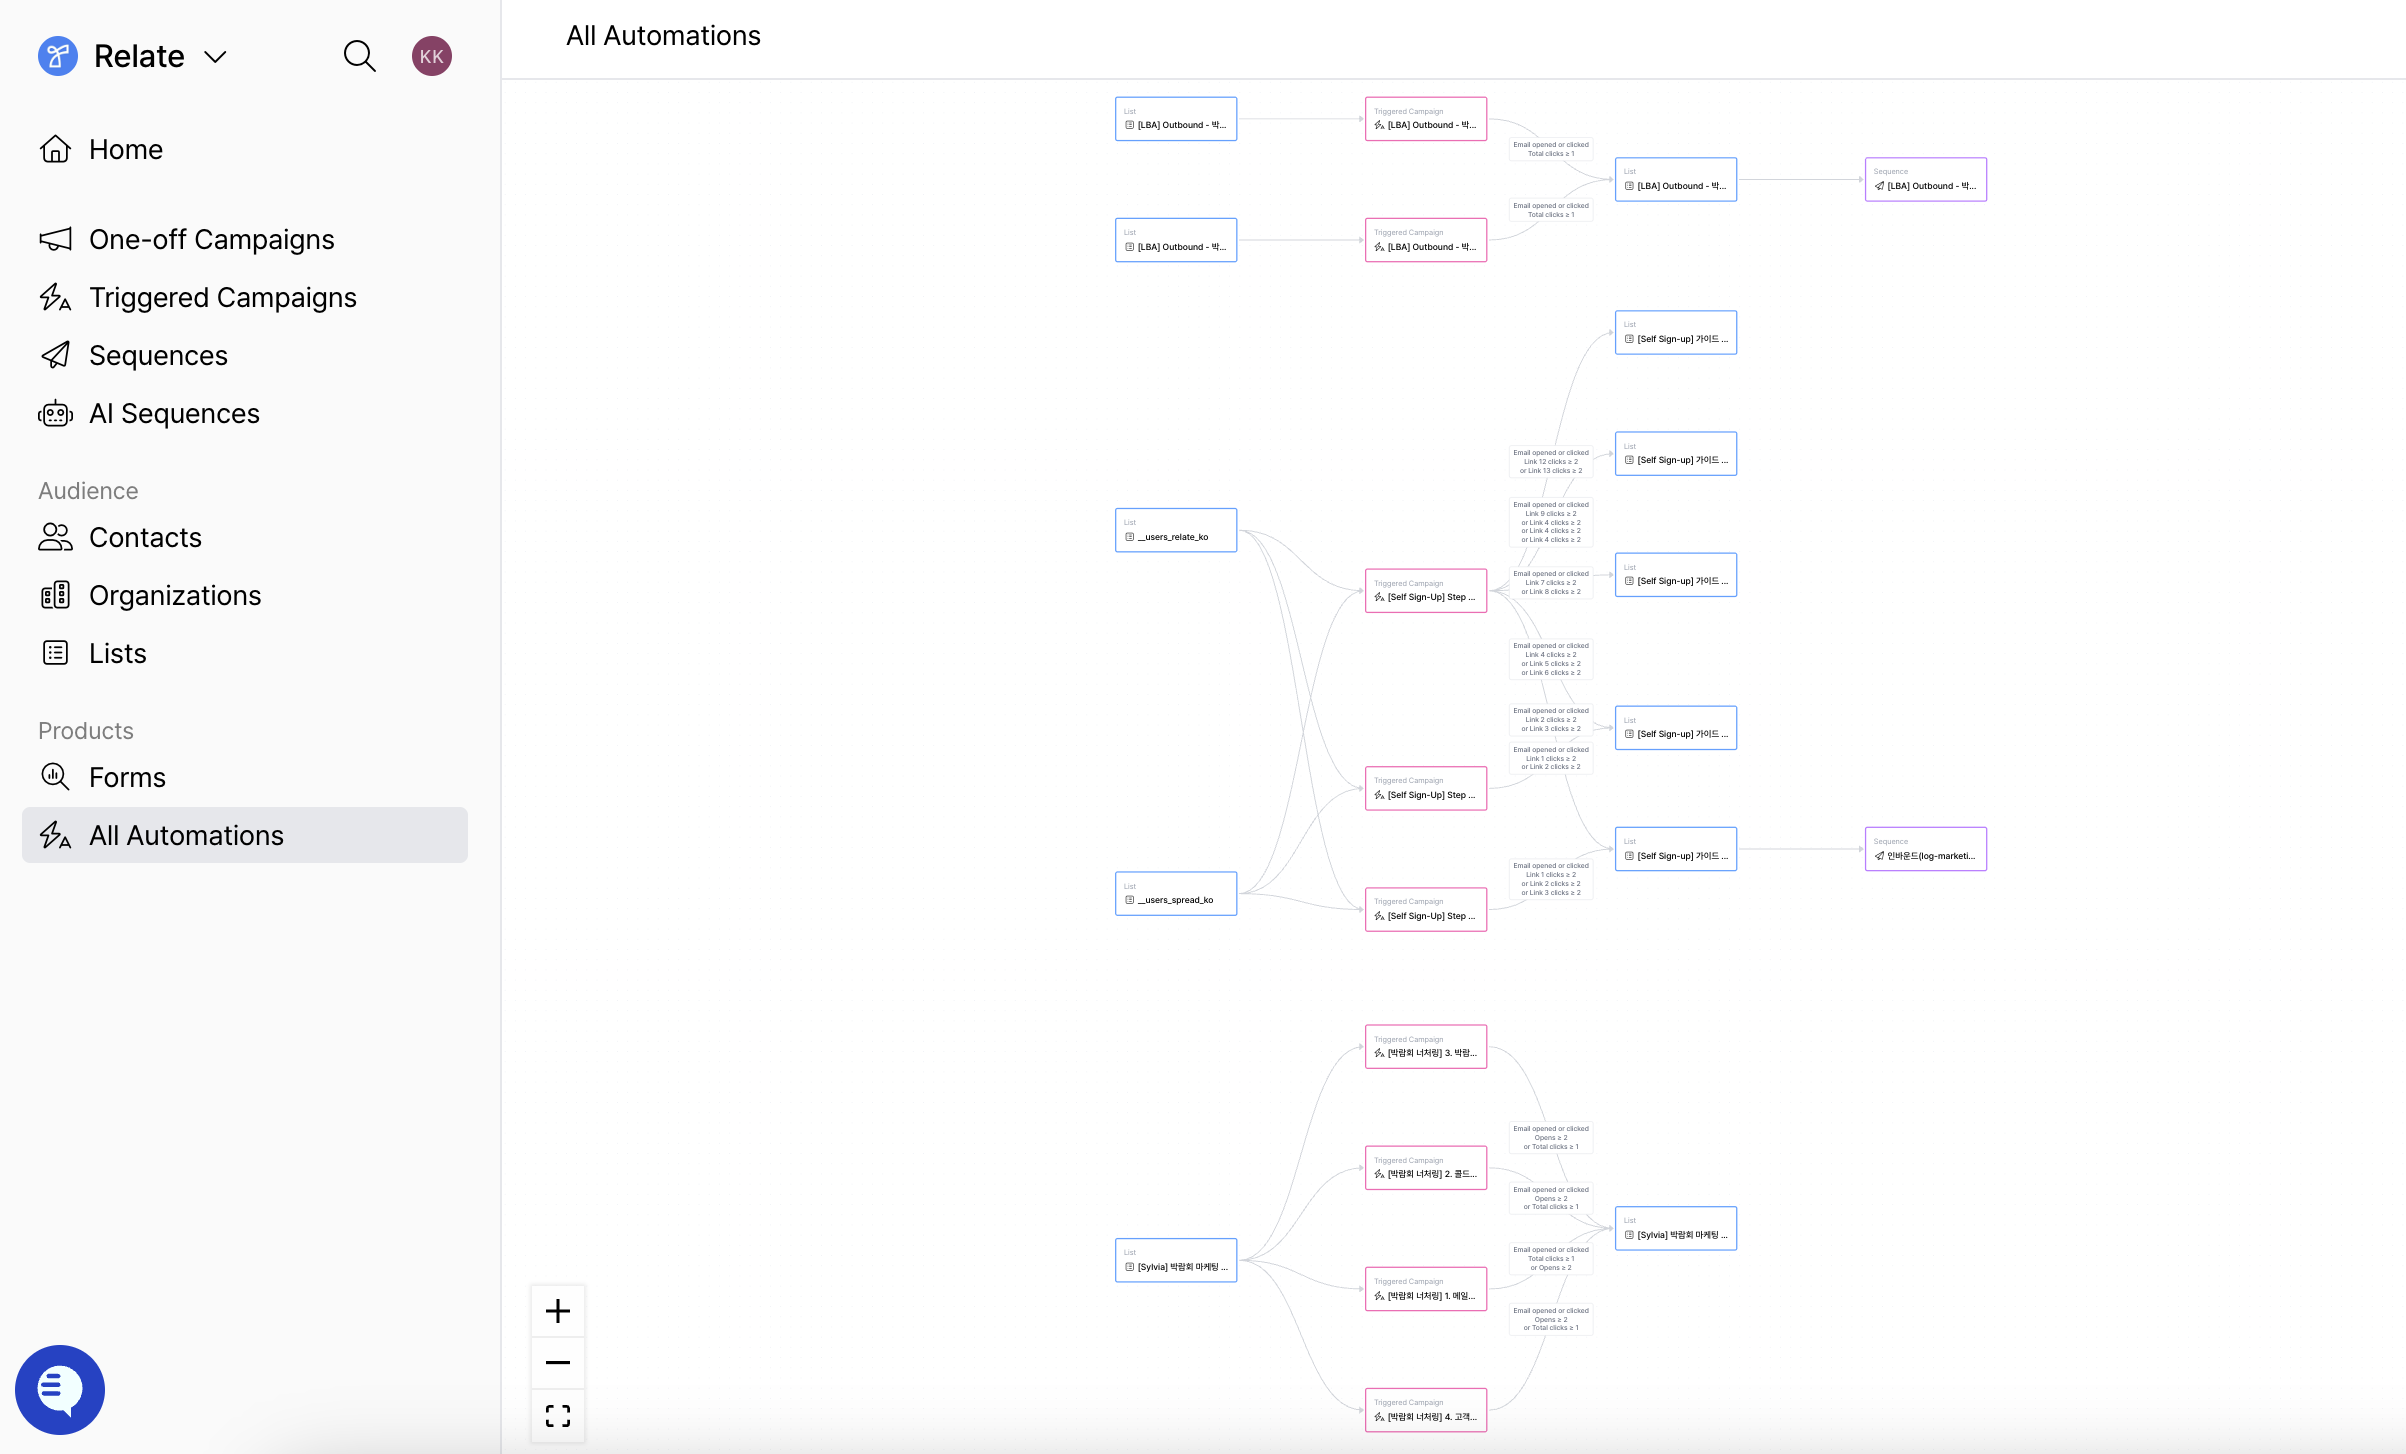
If you click `All Automations` in the left sidebar, you can view all automation flows configured in Emma on a single screen.
It visually shows which list each lead starts from, which emails they go through, and which conditions move them to the next list, allowing you to manage the entire automation structure by flow.
 ***
## Get started with Spread | Emma
Having the leads and emails you already have is enough. You don’t need to collect new leads, and you don’t need to set everything up from the beginning.
AI Writer creates the initial drafts for the email flow, and sending and follow-up decisions are then continued through automation.
Click the button below to apply! We’ll guide you on how to get started in a way that fits your team’s situation.
👉 **Apply for Spread | Emma Early Access**
* **Currently running a Closed Beta Test for customers who have applied**
***
## Get started with Spread | Emma
Having the leads and emails you already have is enough. You don’t need to collect new leads, and you don’t need to set everything up from the beginning.
AI Writer creates the initial drafts for the email flow, and sending and follow-up decisions are then continued through automation.
Click the button below to apply! We’ll guide you on how to get started in a way that fits your team’s situation.
👉 **Apply for Spread | Emma Early Access**
* **Currently running a Closed Beta Test for customers who have applied**